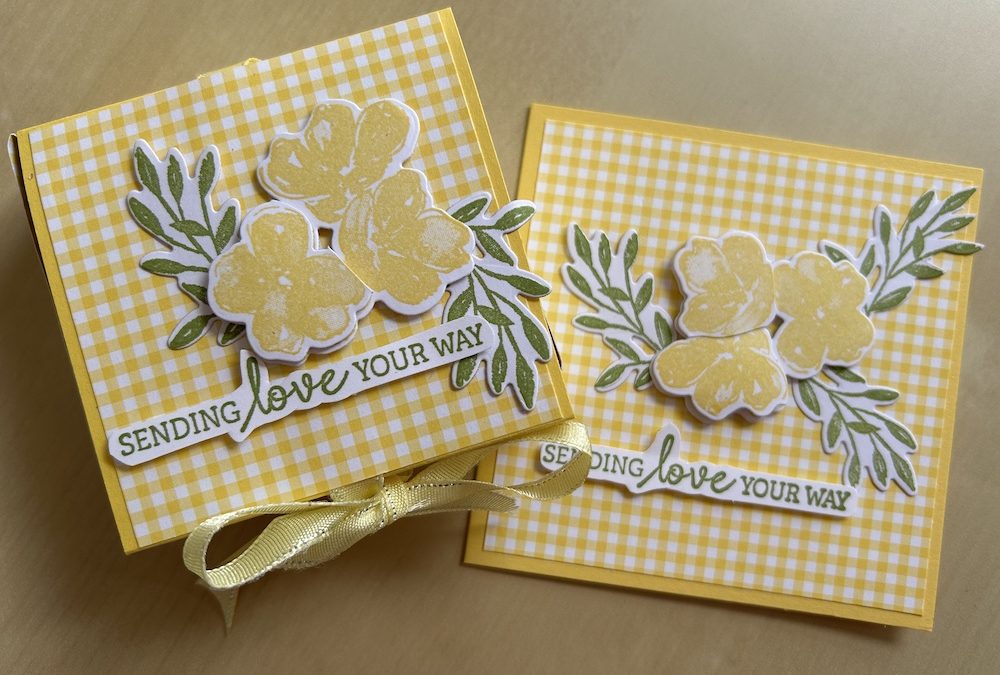
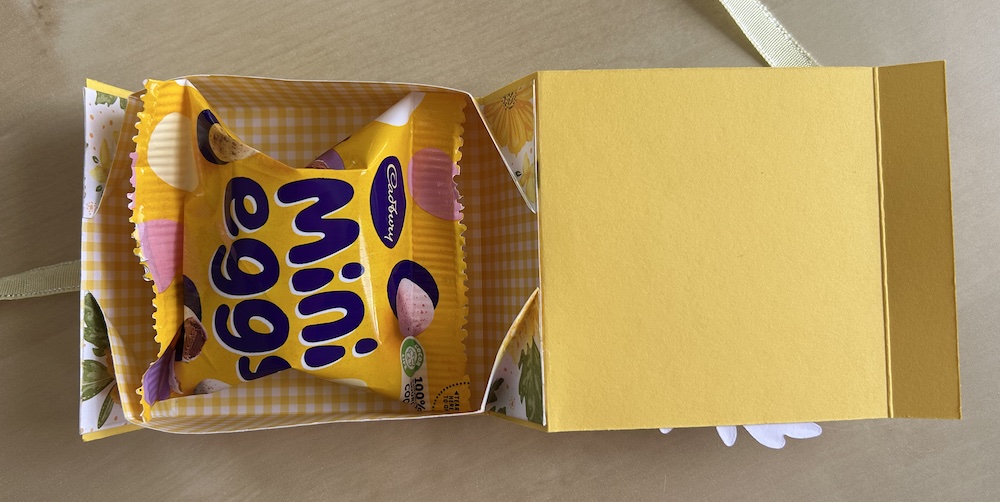
I wanted to design a small gift box and matching card as one of the projects for my ladies attending the Craft’n’Chat in person class this week. I had bought each attendee a pack of mini eggs so it seemed sensible to make a box to fit them. This fold flat box can be made in any size, square or rectangular. They are brilliant for making in bulk as they store flat, but spring into life as a box once ready to use.
This fold flat box fits a small bag of mini eggs, or any gift measuring up to 8cm x 8cm by 4cm deep (3″ x3″ x 1½”). It closes with a ribbon bow.
You will need:
- Daffodil Delight cardstock 8.2cm x 23.5cm (3¼” x 9¼”)
- Floral Delight DSP 14cm x 14cm (5½” x 5½”)
- Floral Delight DSP 7.8cm x 7.8cm (3″ x 3″)
- Approx 50cm (26″) of ribbon
- Scraps of Basic White for stamping/die-cutting the decoration and sentiment
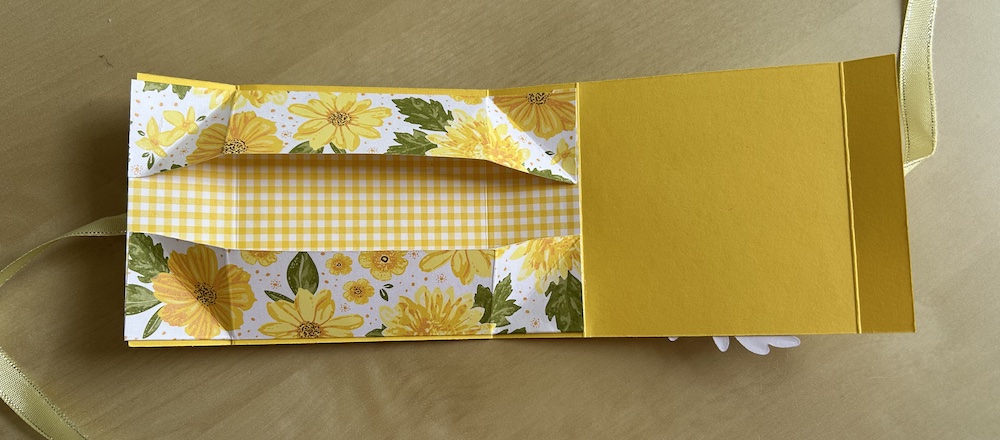
Score the cardstock on the long side at 3cm, 11cm, 14cm and 22cm (1¼”, 4¼”, 5½” and 8½”). Fold carefully and burnish each as mountain folds.
Score the DSP on each side at 3cm (1¼”). Fold and crease all folds.
Create a diagonal fold in each corner by bringing the two side edges together to touch at the corner. Use your finger to crease the resulting diagonal fold in the corner of the paper. See the video below if you are unsure about this. Repeat for each corner.
With the DSP lying square and open in front of you, add glue to the upper inner triangles and lower inner triangles in each corner. Again, see the video if you are unsure.
Fold each side inwards and stick down. This should leave an unstuck “pocket” on each side.
Turn over and add glue all over the back. Stick to the base card between the front edge and the third score line, making sure to line up the creases with the folds on the fold flat box base. You can see what it should look like in the photo below.
Turn the fold flat box over. Lay the ribbon along the card and stick the remaining square of DSP over the outside of the top fold-over panel over the ribbon to secure it. Add a short length of tear & tape on the box bottom to hold the ribbon in place there. See the video if you are unsure.
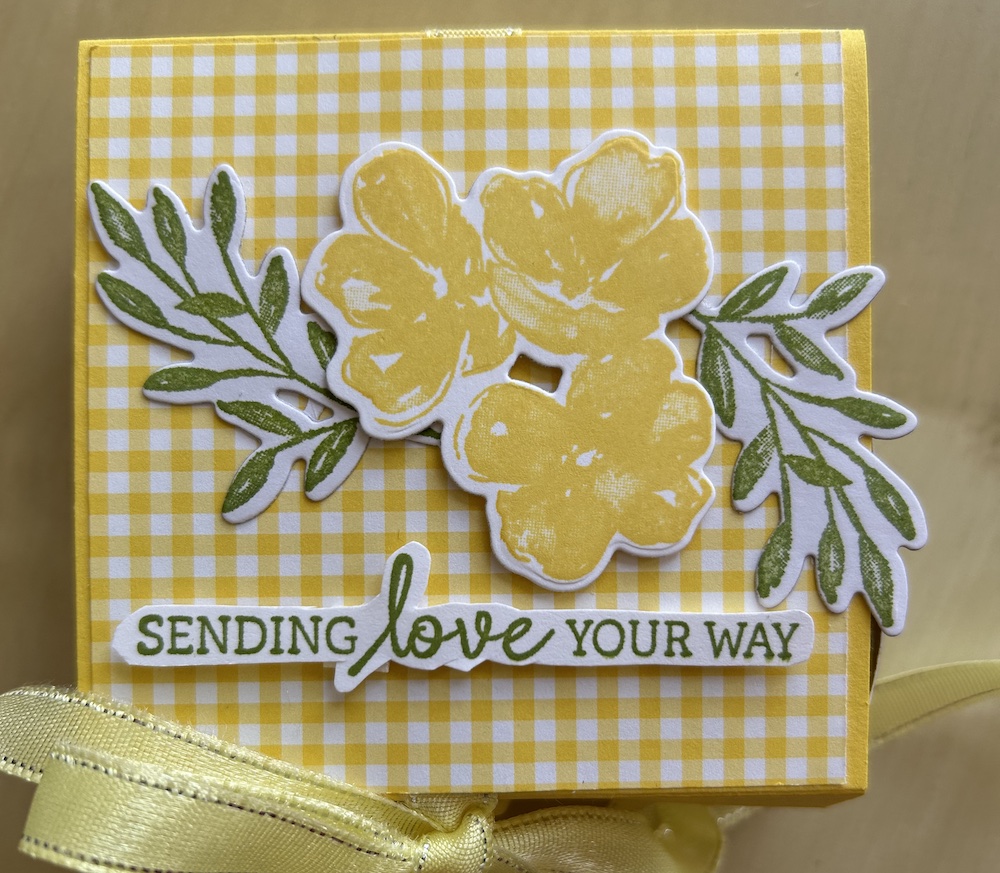
Stamp the flowers, leaves and sentiment for your decoration on scraps of Basic White and die-cut. I used the now retired Regal Flora bundle and Daffodil Delight and Old Olive ink, but you can use any stamp set and inks you wish to coordinate with your choice of colour cardstock and DSP.
Die-cut the images and fussy cut the sentiment.
Add the decoration to the top of the box using dimensionals for the flowers and sentiment. Add your mini eggs and tie the fold flat box closed with the ribbon.
I also made a matching card to go with the box. For this you need:
- Colour cardstock 10cm x 20cm (4″ x 8″)
- Floral Delight DSP 9.5cm x 9.5cm (3¾” x 3¾”)
- Basic White inside panel 7.5cm x 7.5cm (3″ x 3″) (optional)
- Scraps of Basic White for stamping and die-cutting the decoration and sentiment
Score the cardstock in half on the long side at 10cm (4″) and burnish well.
Stoick the DSP to the card front.
Stamp flowers, leaves and a sentiment on Basic White scraps and die-cut or fussy cut. I used the now retired Regal Flora bundle and Daffodil Delight and Old Olive ink, but you can use any stamp set and inks you wish to coordinate with your choice of colour cardstock and DSP.
Add these to your card using dimensionals for the flowers. I stamped a second group of flowers in order to add layers on top of two of the flowers to give added dimension.
I added an inside panel of Basic White to give space for writing and stamped more flowers on it as decoration. (Optional)
You may need to make yourself an envelope for the card as it is not a standard size.
Here is the video of how to make the fold flat box and card:
Thank you for taking the time to read my post.

Don’t forget – you get a FREE tutorial of eight cards when you place an order with me. There’s a different set every month. And, if your order is over £40, you will also get to choose stuff from my online shop to the value of your order!
Product List ![Regal Flora Dies [ 164033 ]](https://assets1.tamsnetwork.com/images/EC042017NF/164033s.jpg "Regal Flora Dies [ 164033 ]") | ![Daffodil Delight A4 Card Stock [ 121680 ]](https://assets1.tamsnetwork.com/images/EC042017NF/121680s.jpg "Daffodil Delight A4 Card Stock [ 121680 ]") | |||
![Basic White A4 Cardstock [ 166781 ]](https://assets1.tamsnetwork.com/images/EC042017NF/166781s.jpg "Basic White A4 Cardstock [ 166781 ]") | ![Old Olive Classic Stampin' Pad [ 147090 ]](https://assets1.tamsnetwork.com/images/EC042017NF/147090s.jpg "Old Olive Classic Stampin' Pad [ 147090 ]") | ![Multipurpose Liquid Glue [ 154974 ]](https://assets1.tamsnetwork.com/images/EC042017NF/154974s.jpg "Multipurpose Liquid Glue [ 154974 ]") | ![Paper Trimmer [ 152392 ]](https://assets1.tamsnetwork.com/images/EC042017NF/152392s.jpg "Paper Trimmer [ 152392 ]") |
![Floral Delight 12" X 12" (30.5 X 30.5 Cm) Designer Series Paper [ 164700 ]](https://assets1.tamsnetwork.com/images/EC042017NF/164700s.jpg "Floral Delight 12\" X 12\" (30.5 X 30.5 Cm) Designer Series Paper [ 164700 ]")
![Regal Flora Cling Stamp Set (English) [ 164157 ]](https://assets1.tamsnetwork.com/images/EC042017NF/164157s.jpg "Regal Flora Cling Stamp Set (English) [ 164157 ]")
![Daffodil Delight 1/8" (3.2 Mm) Satin Ribbon [ 164715 ]](https://assets1.tamsnetwork.com/images/EC042017NF/164715s.jpg "Daffodil Delight 1/8\" (3.2 Mm) Satin Ribbon [ 164715 ]")
![Daffodil Delight Classic Stampin' Pad [ 147094 ]](https://assets1.tamsnetwork.com/images/EC042017NF/147094s.jpg "Daffodil Delight Classic Stampin' Pad [ 147094 ]")
