
I apologise again there is no Live today, but I’m fetching and carrying for hubby after his knee replacement. All being well, I’ll be back live next week! Instead, here is a fun fold card for you, an easy Z fold card.
I made this Z fold card for our crafty Team meeting last Friday. It is a simple fun fold, even though there seem to be a lot of pieces! I added a back panel to give me room to write a message, but this is optional. It can be made for any occasion.
I used retired DSP and a retired stamp set for the sentiment but you can substitute any DSP and stamp set of your choice. The Country Lace DSP will go with many cardstock colours.
This Z fold card design is very versatile – you could put a panel for a message in the centre (undecorated) panel or on the inner half of the back area if you did not want to add a separate piece of cardstock behind the card, for example.
The video of me making this card is at the end of this post.
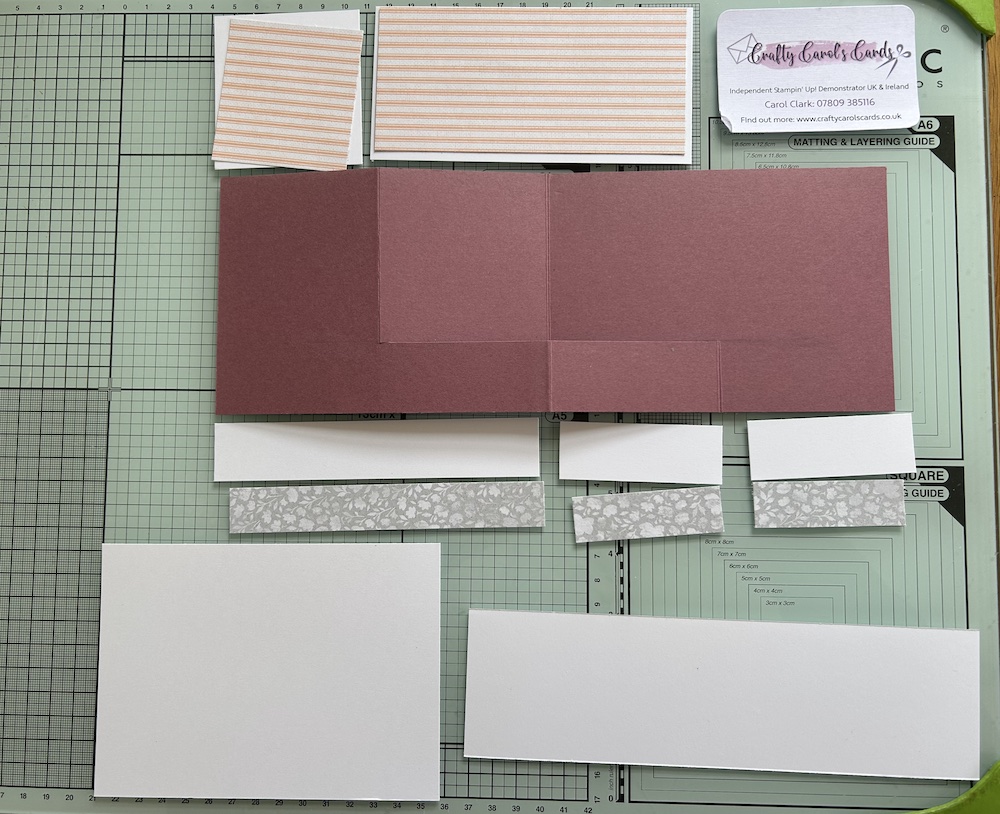
You will need:
- Colour cardstock base 10.5cm x 29cm (4” x 9¾”)
- Basic White panel 10.5cm x 14.5cm (optional) (4” x 5¼”) for back of card
- Basic White panel 7cm x 14cm (2 7/8” x 4 3/8”)
- Basic White panel 6.5cm x 7cm (2 7/8” x 2 7/8”)
- Basic White panel 2.5cm x 14cm (7/8” x 5 1/8”)
- Basic White panel (x2) 2.5cm x 6.8cm (7/8” x 2 1/8”)
- DSP pattern 1: 6.5cm x 13.5cm (2¼” x 4¼”)
- DSP pattern 1: 6cm x 6.5cm (2¾“ x 2¾“)
- DSP pattern 2: 2cm x 13.5cm (3/4“ x 5”)
- DSP pattern 2 (x2): 2cm x 6.2cm (3/4” x 2”)
- Basic White length (approx 7cm /3″ wide) for stamping
Here are all the pieces laid out so you can check you have them all ready:
I used Moody Mauve as my base as it will soon be retired and I love the colour! Just choose a favourite DSP and then choose a colour base card that coordinates.
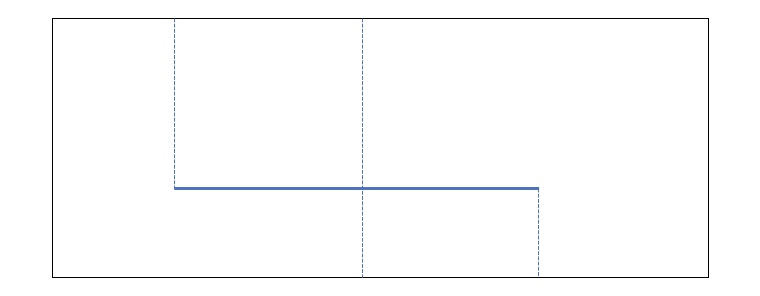
Take your base card and place it in your trimmer short side up and touching the 3cm (1″) mark on the right. Use a pencil down the trimmer channel to mark the card base at roughly 1/3 from the top and from the bottom.
Turn the long side upwards with the pencil mark at the bottom.
Score at 7.25cm from the top down to the pencil mark.
Turn through 180 degrees and score at 7.25cm down to the pencil mark.
Turn so the short side is upwards with the pencil lines on the right and place the cardstock to touch the 3cm (1″) mark on the right.
CUT from the top score line to the bottom score line.
Rub out any pencil lines.
It should look like this:
Fold to form the Z fold card:
- Centre fold is valley at the top and mountain at the bottom.
- Left hand fold is mountain and
- Right hand tiny fold is also mountain.
Burnish well.
Please see the video below if any of this is confusing!
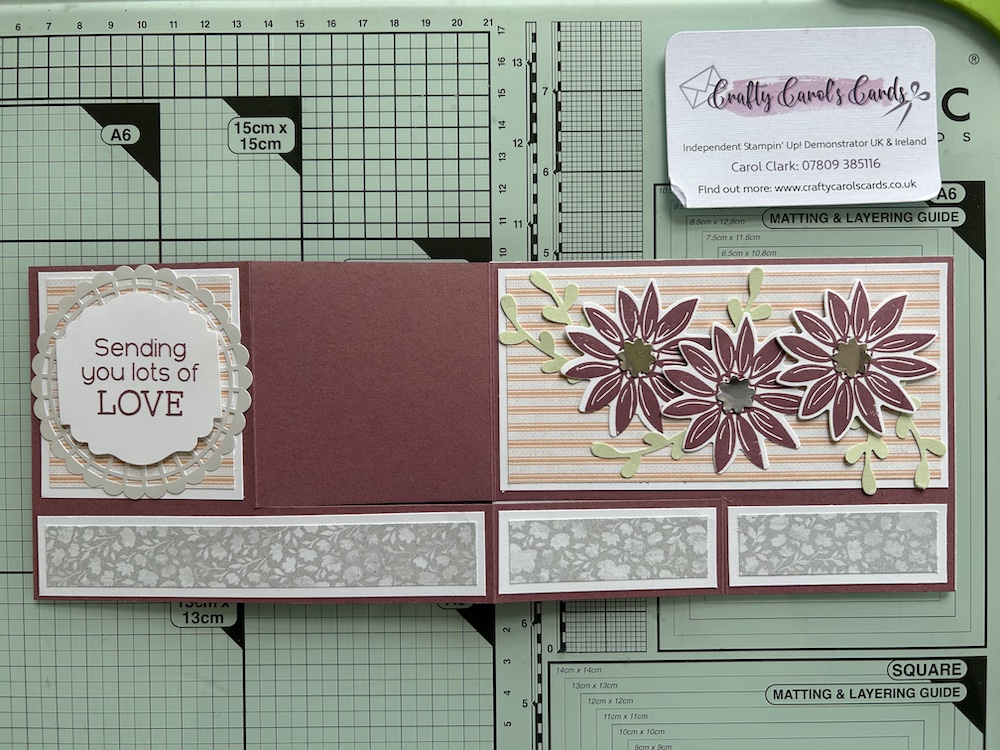
Add your Basic White layers and DSP to your Z fold card as shown in the picture below.
Decorate as you wish. Here is what I did:
Stamp three flowers in Moody Mauve and die cut out.
Punch out or die-cut a sentiment panel and stamp the sentiment in Moody Mauve.
Punch out or die-cut three leaf sets and three tiny flowers (for the centres of the large flowers).
I also found an old doily shape which I added on the card front behind my sentiment panel.
Complete the Z fold card as shown below. I put the right-hand flower up on dimensionals.

If using the optional back panel, stamp a sentiment centrally on the panel and decorate it with a small flower stamp.
Stick this panel to the back of the card and your Z fold card is complete.

Don’t forget to decorate your envelope! I stamped the small flowers again for that.
Here is the video of me making this Z fold card:
I hope you like this card and will have a go at making one – please show me what you come up with.
Thank you for taking the time to read my post.

Don’t forget – you get a FREE pdf when you place any order with me as your demonstrator. And, if your order is over £40, you will also get to choose stuff from my online shop to the value of your order!
Product List ![Moody Mauve A4 Cardstock [ 161732 ]](https://assets1.tamsnetwork.com/images/EC042017NF/161732s.jpg "Moody Mauve A4 Cardstock [ 161732 ]") | ![Basic White A4 Cardstock [ 166781 ]](https://assets1.tamsnetwork.com/images/EC042017NF/166781s.jpg "Basic White A4 Cardstock [ 166781 ]") | ![Paper Trimmer [ 152392 ]](https://assets1.tamsnetwork.com/images/EC042017NF/152392s.jpg "Paper Trimmer [ 152392 ]") |
![Country Lace 12" X 12" (30.5 X 30.5 Cm) Designer Series Paper [ 163415 ]](https://assets1.tamsnetwork.com/images/EC042017NF/163415s.jpg "Country Lace 12\" X 12\" (30.5 X 30.5 Cm) Designer Series Paper [ 163415 ]")
![Moody Mauve Classic Stampin' Pad [ 161649 ]](https://assets1.tamsnetwork.com/images/EC042017NF/161649s.jpg "Moody Mauve Classic Stampin' Pad [ 161649 ]")

