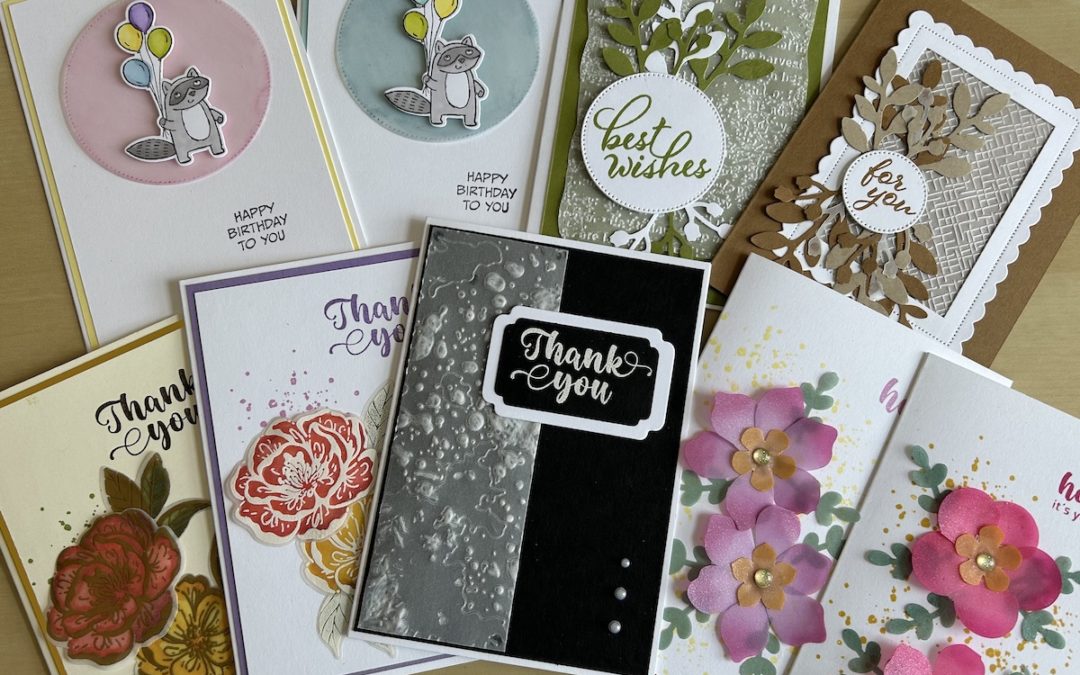
I’m celebrating! This post contains my 100th video on YouTube which makes me very proud. You can find all my videos on my YouTube channel (@craftycarolscards) and I’d love you to subscribe if you haven’t already. But don’t worry if you don’t want to as my videos can also be found in my blog posts. So it’s more important that you sign up for my email list in order to get notifications that a new post has been published and also to receive my weekly news. (You can sign up on my home page or the main Craftalong blog page.)
Anyway, to celebrate my 100th video I wanted to do something special. I hadn’t played with vellum for a while until this week when I made some vellum cards for the T4S blog hop which you can find here. So I decided to use this post to give you five ways to use vellum.
Without further ado, let’s get going! You can see the ideas in the video below or read on for instructions and measurements.
Idea 1: Embossing folders and vellum
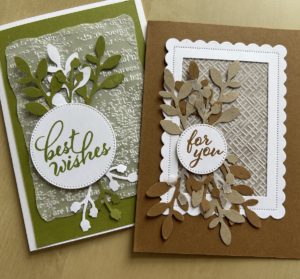 The T4S blog post on Tuesday showed two cards made using the basic idea.
The Old Olive card used a piece of vellum 9.5cm x 12.5cm which was cut using a Stitched with Whimsy die then run through the Timeworn Type embossing folder.
The Pecan Pie card used a piece of vellum 9.5cm x 6.5cm embossed with the cross-hatch folder from the Basics 3D embossing folders set, an online exclusive product and set into a frame made with the largest Scalloped Contour die.
Full details can be found in the previous blog post here.
Idea 2: Embossing the embossing
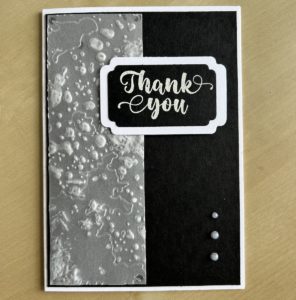 I developed the above idea into a monochrome card made in a similar way using double embossing.
I cut a strip of vellum 5cm x 14cm and ran it through the retired Splatters embossing folder. I placed the vellum on the SU piercing mat (any soft mat would do) and used the larger ball end of the scorer from the Scoreboard on the debossed side of th4 vellum to “fill in” some of the dots and splodges.
When you turn that piece over, you can see the dots and splurges are emphasised and white. You can ty this with any embossing folder that produces circular or other enclosed areas that you can then emboss.
The double embossed piece was stuck to the left-hand side of a piece of Basic Black 10cm x 14.3cm using glue dots hidden behind the double embossed white areas. This was stuck to a Basic White card base 21cm x 14.8xm scored and folded in half at 10,5cm.
I stamped the sentiment (from the Irresistible Blooms set) in Versamark on a scrap of Basic Black and embossed it with white embossing powder. I layered it onto a piece of Basic White cutting out both using the Something Fancy dies. The card was finished with three pearl gems.
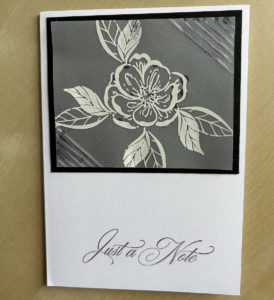 Another way to use the Scoreboard tool to emboss vellum (idea 2b?) is to use a ruler or the Scoreboard itself to score parallel lines in the vellum. (Or make it easy for yourself and use some of the new Vellum Basics speciality paper!)
Here is a card I made using that technique. I scored lines on two opposite corners of a 9.5cm x 8cm piece of vellum. Then I embossed the smaller flower and leaves from the Irresistible Blooms set in white in the centre of the vellum.
I stuck this to a piece of Basic Black 10cm x 8.5cm using dots of multipurpose glue added behind the embossed areas. this was adhered to a Basic White card base and I then added a greeting from the Go To Greetings set.
Idea 3: Water colouring on vellum
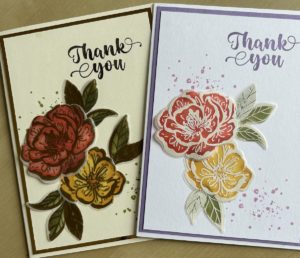 I stamped two sets of flowers and leaves from the irresistible Blooms set in Versamark onto a piece of vellum and then used white embossing powder on one set and gold embossing powder on the other which produces very different results. I die-cut all the images out.
You can then point these embossed images. Make sure you do this on the reverse side and the colour will then show through the image.
I put one drop each of Poppy Parade, Crushed Curry and Old Olive inks onto a stamping block and used my aqua painter to pick up the colour and paint the images on the reverse of the vellum. First I painted the colour around the edges of the petals then I cleaned the aqua painter and used it to bring the colour down to fill in the petals which gave me a two-hue look. I coloured the leaves in a similar way. Note: Leave these to dry or use a heat tool to dry them before making up the card.
I used Very Vanilla for the base card and top layer (9.5cm x 13.8cm) for the gold embossed flowers and leaves on top of a 10cm x 14.3cm layer of Gold Foil. I stamped the sentiment from the Irresistible Blooms stamp set in Early Espresso and added a background using the splatter stamp and Crushed Curry – I’m very partial to a splatter background!
I made up the white card in the same way using a coloured layer of Highland Heather and using Fresh Freesia for the sentiment and splatters.
Idea 4: Colouring vellum using alcohol blends
Another way I often use vellum is as a background to a focal image.
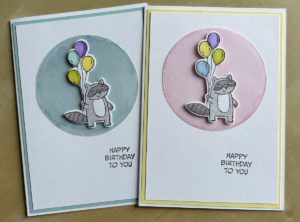 Here I die-cut the largest Stylish Shape circle out of vellum. I used my Bubble Bath and Balmy Blue stamping Blends to colour the reverse of the stitched shape. The alcohol in the blends means they cover the vellum well. Keep adding layers of colour until the colour as seen from the correct side is the depth you want.
If you can see brush marks, use a tiny amount of alcohol such as surgical spirit on a sponge to smooth these out.
I stamped, coloured and die-cut the raccoon and balloons image from the fun Zany Zoo suite. I stuck this to the vellum circle using dimensionals, then added glue dots to the reverse of the vellum behind the image to stick it to the card. The layers used are the same sizes as previously given above. The sentiment from the Zany Zoo set was stamped in Memento.
You can also use this colouring technique on the new Vellum Basic speciality paper to give you a lovely soft coloured patterned background.
Colouring vellum this way gives you a softer effect than using coloured cardstock. Try it!
Idea 5: Inked vellum flowers
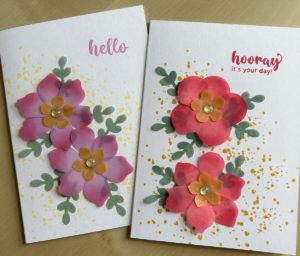 My final idea uses some retired products but you can also make these flowers by colouring a plain piece of vellum in your choice of strong colours before die-cutting or punching your flower petals, centres and leaves.
I used some of last year’s In Color shimmer vellum to cut out petals, centres and leaves. Then I used Melon Mambo and Crushed Curry ink pads and my mini blending brushes to add a darker colour to the edge of each petal and the flower centres. (I decided colouring the punched-out leaves was really too fiddly!)
Use either a small piece of vellum or a piece of tear’n’tape plus multipurpose glue to stick the petals together then add the flower centre. Once dry, use your palm and a large-headed embossing tool to shape your flowers.
I prepared the basic White card bases by stamping a sentiment and adding some splatters then I stuck on the flowers using glue or dimensionals behind the flower centres. I added the leaves putting glue just on the bottom pair of leaves and the stem base.
Whew! That’s the lot.
I hope you enjoyed this post (and watched my 100th video!) More importantly, I hope it encourages you to try some of these techniques and use some vellum in your card-making, My Vellum Basic speciality papers have just arrived so I look forward to having a play.
See you again soon,
Love,
Carol x
Product List
|
|
|
|
||
|
|
|
|
|
|

