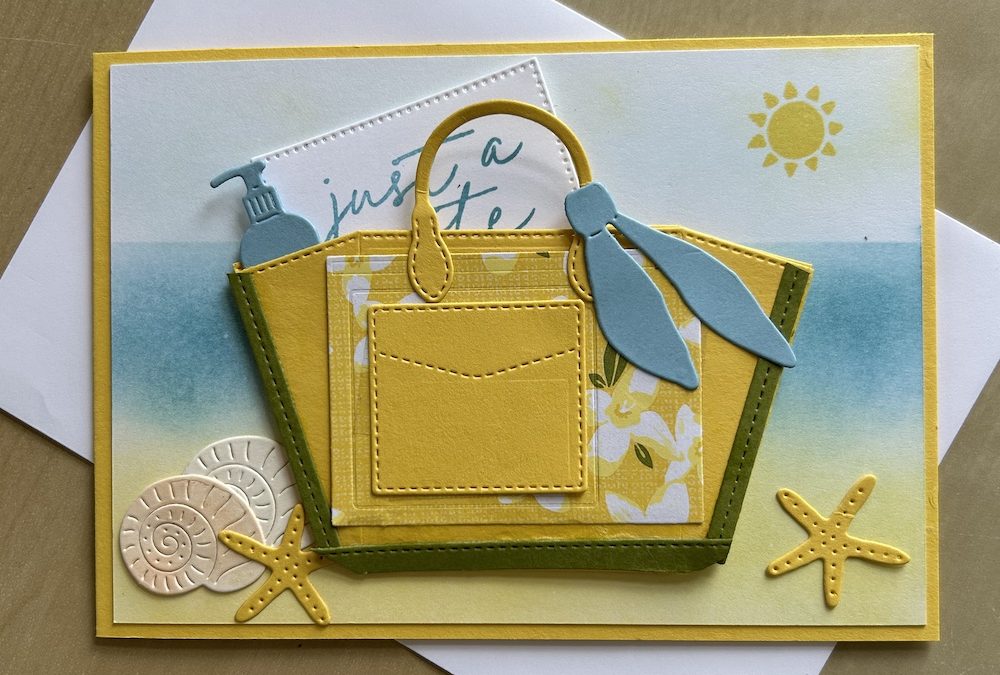
This month’s T4S blog hop theme is Summer Sunshine. As soon as I saw the theme, I knew I wanted to use the new Online Exclusive Notes & Totes bundle. The stamp set has a sunshine stamp, and the dies make the most gorgeous tote bags, which can be used on their own or made into a card, as I have done here, to contain a pull-out note.

Here is a picture of the card showing the note which sits inside the tote bag:
To make this Summer Sunshine card you will need:
- One A4 or US size cardstock sheet of Daffodil Delight
- Basic White layer 10cm x 14.3cm (4” x 5¼”)
- Basic White for inside 9.5cm x 13.8cm (3¾” x 5”)
- Small piece of coordinating DSP approx 7.5cm x 11cm (3″ x 4″) – I used Floral Delight
- Piece of Basic White 6cm x 7.5cm (2½”x 3″) for the note inside the bag
- Small piece of Balmy Blue for the bag tag and bottle
- Scrap of a coordinating colour cardstock for the trim – I used Old Olive
- Scrap of Very Vanilla for the shells
- Balmy Blue, Daffodil Delight and Calypso Coral ink pads
- Two blending brushes, one sponge dauber
- Notes & Totes bundle
- Stylish Shapes dies or other rectangle or square die
Instructions
Cut the Daffodil Delight sheet in half lengthwise to measure 10.5cm x 29.6cm, and score at 14.8cm (11” x 4¼” scored at 5½”). Fold in half and burnish well. Keep the second half of the sheet for die-cutting.
Make the background for the front of the card by sticking a piece of scrap paper across the card where you want the “horizon” to be and blending a strip of Balmy Blue ink across the centre of the card using your blending brush.
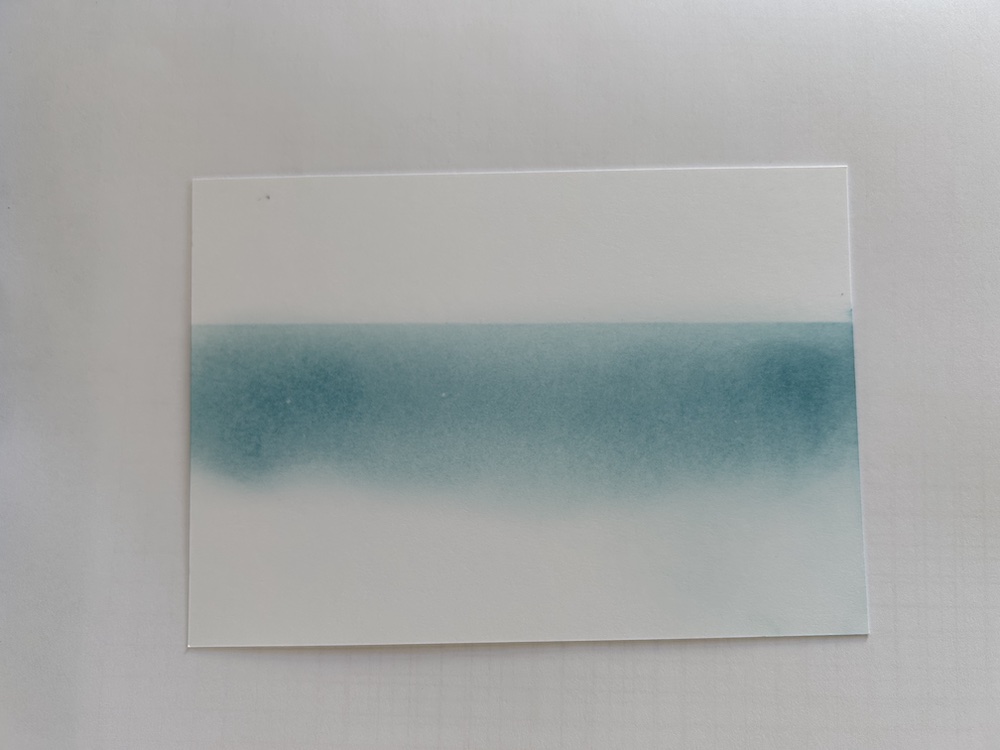
Without adding more ink to your blending brush, use the blending brush across the sky area to give a light colouring.
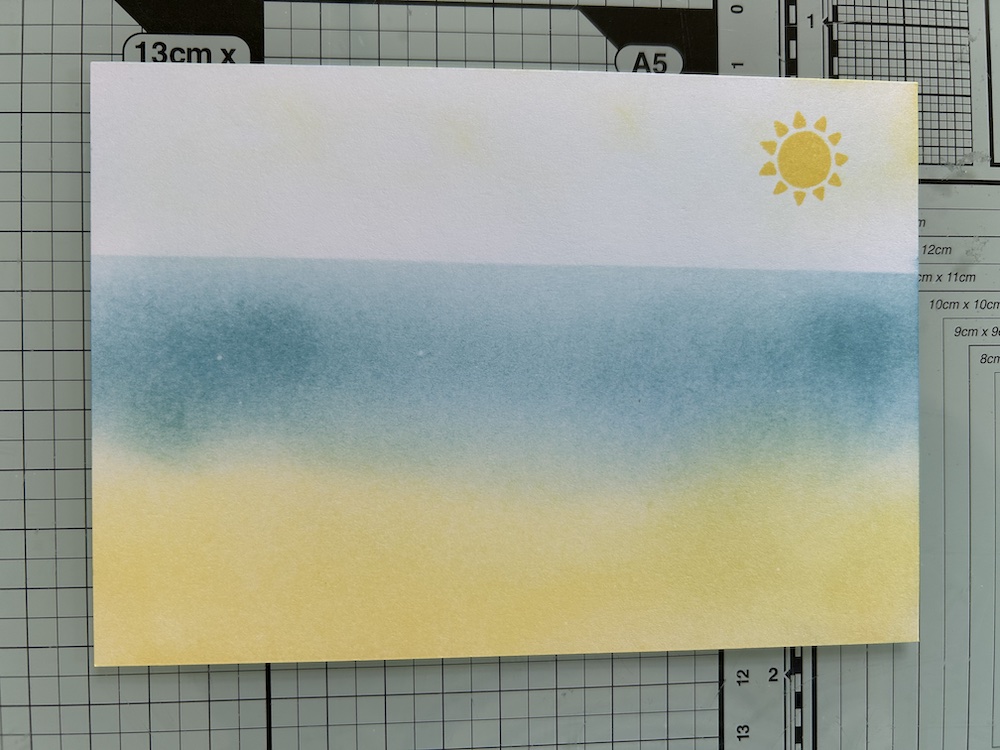
Add some Daffodil Delight “sand” across the bottom of the card blending into the edge of the “sea”. I also added a tiny bit of yellow to the sky in the corner as a hazy halo around where I stamped the sun in Daffodil Delight.
Here is the finished background:
Stick the completed background to the Summer Sunshine card front.
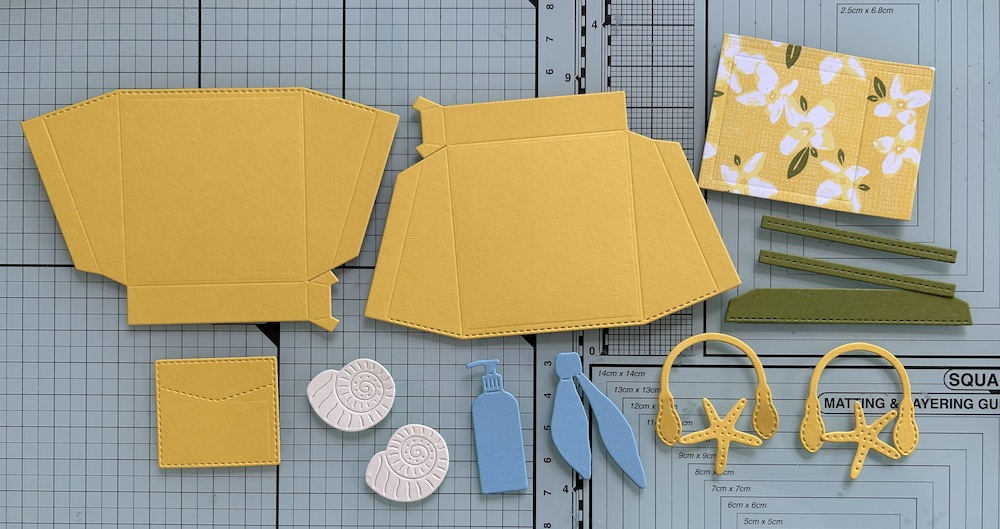
Die-cut two bag bases, the bag pocket, two bag handles and two starfish from Daffodil Delight.
Die-cut a trim set in Old Olive.
Die-cut the rectangular panel from the DSP. (I also cut a second piece for inside my bag, this is optional!)
Die-cut a water bottle and a bag tie from Balmy Blue.
Die-cut two shells from Very Vanilla.
Here are the pieces you should now have:
I trimmed some of the tabs off the bag panels as shown in the picture below:
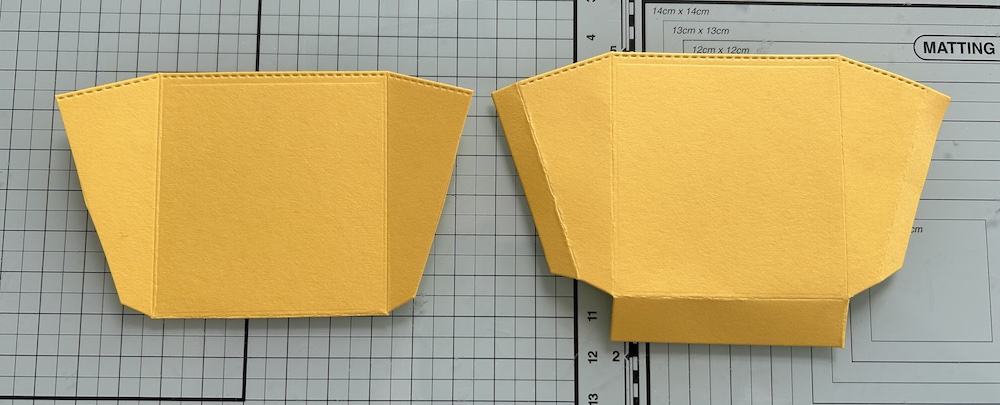
Then I stuck them together carefully around the bottom and side edges with both “right” sides facing forwards. Make sure to leave the bag itself open so the note can be placed inside at the end!
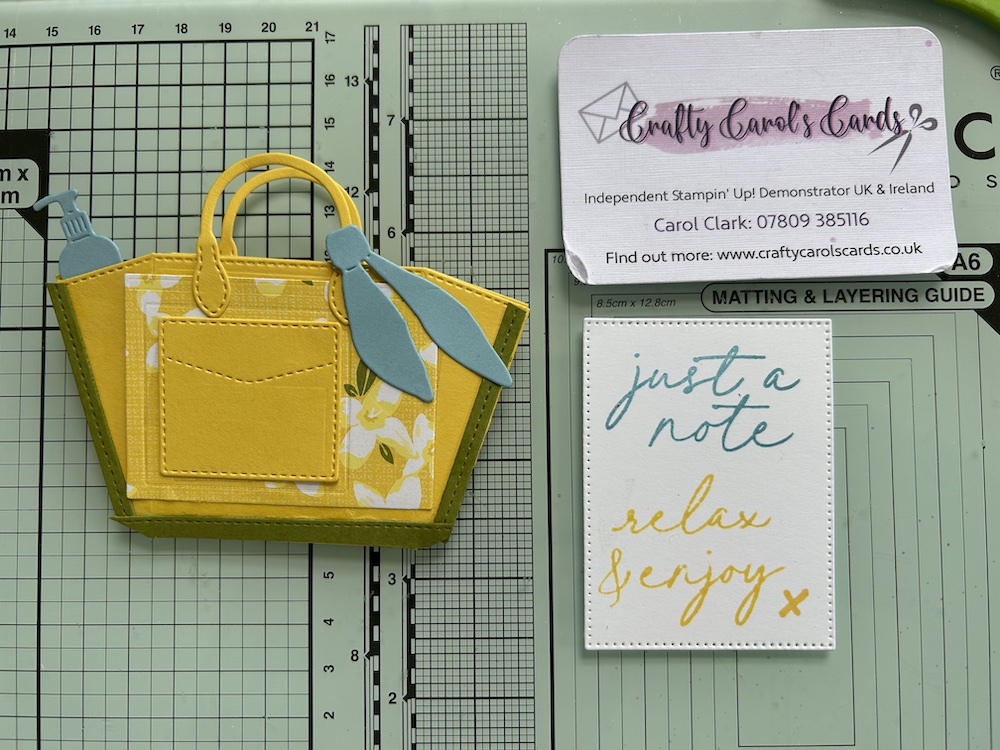
I adhered the trim pieces around the edges of the bag, trimming the bottom one to half its width. I then stuck the DSP panel across the bag centre, and added the pocket on the front. I stuck the bag handles on top, one on the front of the bag and one on the back, both facing forwards.
I adhered the blue water bottle inside the left front and the bag tie to the right hand handle.
For the note to go inside the bag, I used a partial die-cutting technique with the largest Stylish Shapes square die to cut a rectangle from Basic White that is 5.5cm x 7cm (2 1/8″ x 2 3/4″).
I stamped “Just a note” in Balmy Blue and stamped “relax and enjoy” in Daffodil Delight using a partial stamping technique. I added a kiss with my Daffodil Delight Stampin Write marker.
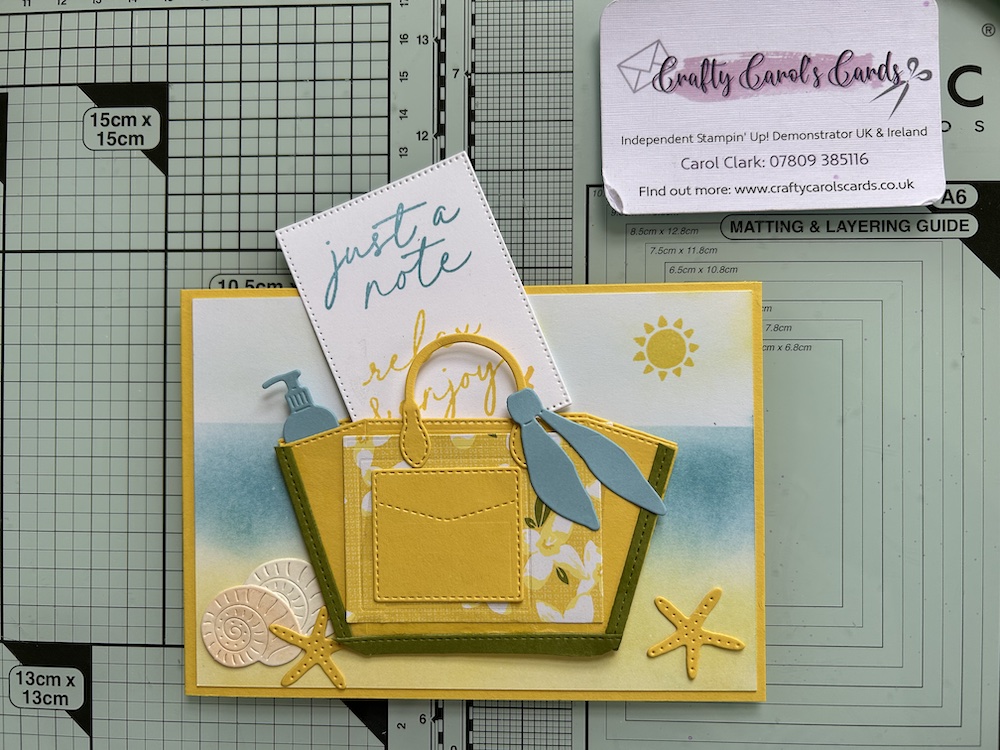
Here is the finished bag and note:
To complete the front of the Summer Sunshine card, I stuck the bag in the centre of my Summer Sunshine beach scene background. I coloured one shell with a sponge dauber in pale Calypso Coral, leaving the other one plain. Stick the shells and the starfish to the card front wherever looks best! I then slid the note into the bag.
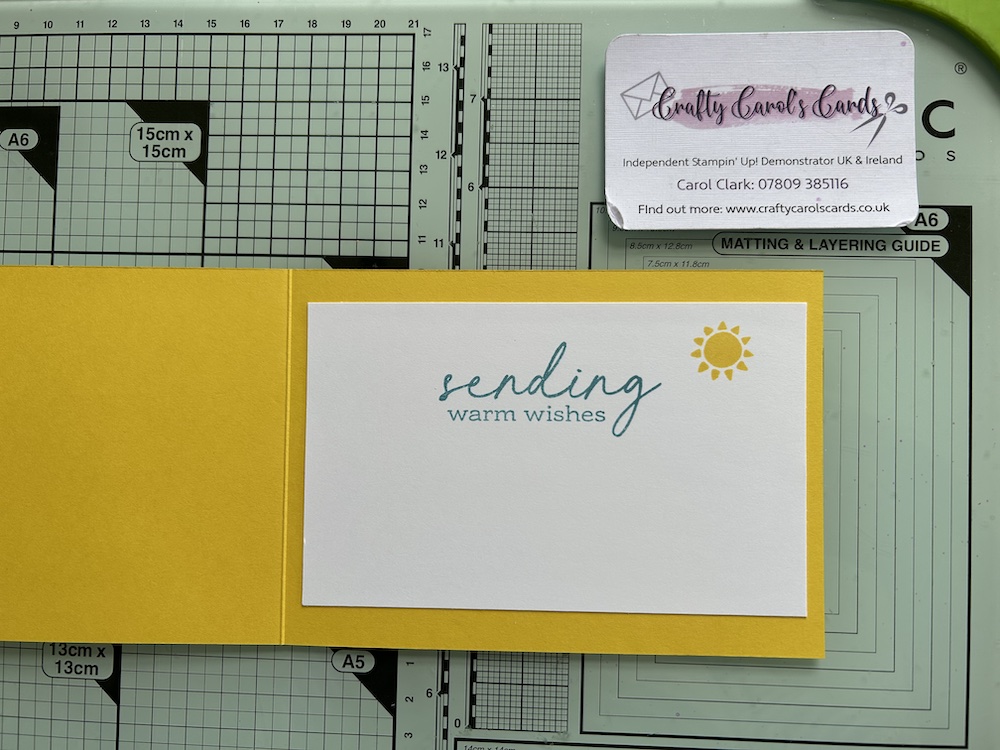
For the inside of the card Basic White panel, I stamped the “sending warm wishes” in Balmy Blue and the sun in Daffodil Delight, then stuck the completed panel inside my card:
My Summer Sunshine card was then complete!
Don’t forget to decorate your envelope! I stamped the sun in two opposite corners on the front of the envelope, or you could die-cut more shells or starfish to stick on as decoration.
Please now go and look at the other gorgeous cards my fellow blog hoppers have made using the links below.
I hope you like this card and will have a go at making one – please show me what you come up with.
Thank you for taking the time to read my post.

Don’t forget – you get a FREE pdf when you place any order with me as your demonstrator. And, if your order is over £40, you will also get to choose stuff from my online shop to the value of your order!
Product List ![Notes & Totes Bundle (English) [ 165241 ]](https://assets1.tamsnetwork.com/images/EC042017NF/165241s.jpg "Notes & Totes Bundle (English) [ 165241 ]") | ![Daffodil Delight A4 Card Stock [ 121680 ]](https://assets1.tamsnetwork.com/images/EC042017NF/121680s.jpg "Daffodil Delight A4 Card Stock [ 121680 ]") | ![Balmy Blue A4 Cardstock [ 147007 ]](https://assets1.tamsnetwork.com/images/EC042017NF/147007s.jpg "Balmy Blue A4 Cardstock [ 147007 ]") | ![Old Olive A4 Card Stock [ 106576 ]](https://assets1.tamsnetwork.com/images/EC042017NF/106576s.jpg "Old Olive A4 Card Stock [ 106576 ]") | |
![Blending Brushes [ 153611 ]](https://assets1.tamsnetwork.com/images/EC042017NF/153611s.jpg "Blending Brushes [ 153611 ]") | ![Stylish Shapes Dies [ 159183 ]](https://assets1.tamsnetwork.com/images/EC042017NF/159183s.jpg "Stylish Shapes Dies [ 159183 ]") | |||
![Sponge Daubers [ 133773 ]](https://assets1.tamsnetwork.com/images/EC042017NF/133773s.jpg "Sponge Daubers [ 133773 ]") | ![Basic White A4 Cardstock [ 166781 ]](https://assets1.tamsnetwork.com/images/EC042017NF/166781s.jpg "Basic White A4 Cardstock [ 166781 ]") | ![Very Vanilla A4 Cardstock [ 166785 ]](https://assets1.tamsnetwork.com/images/EC042017NF/166785s.jpg "Very Vanilla A4 Cardstock [ 166785 ]") |
![Floral Delight 12" X 12" (30.5 X 30.5 Cm) Designer Series Paper [ 164700 ]](https://assets1.tamsnetwork.com/images/EC042017NF/164700s.jpg "Floral Delight 12\" X 12\" (30.5 X 30.5 Cm) Designer Series Paper [ 164700 ]")
![Daffodil Delight Classic Stampin' Pad [ 147094 ]](https://assets1.tamsnetwork.com/images/EC042017NF/147094s.jpg "Daffodil Delight Classic Stampin' Pad [ 147094 ]")
![Balmy Blue Classic Stampin' Pad [ 147105 ]](https://assets1.tamsnetwork.com/images/EC042017NF/147105s.jpg "Balmy Blue Classic Stampin' Pad [ 147105 ]")
![Calypso Coral Classic Stampin' Pad [ 147101 ]](https://assets1.tamsnetwork.com/images/EC042017NF/147101s.jpg "Calypso Coral Classic Stampin' Pad [ 147101 ]")


Carol, I love your card! It screams sunshine! Don’t eat too much chocolate!
Thank you! Though I can’t promise not to eat too much chocolate!!
Such a beautiful sunshine themed card Carol – the tote bag definitely reminds me of beach days in the sun !
Thank you – that was exactly the idea!