It’s blog hop time again! This month’s theme is Card for Kids. Now I don’t have any specific children’s stamp sets, but I do have some gorgeous animal sets and it is those that I felt would be appropriate for this month’s blog hop to make a card for a child.

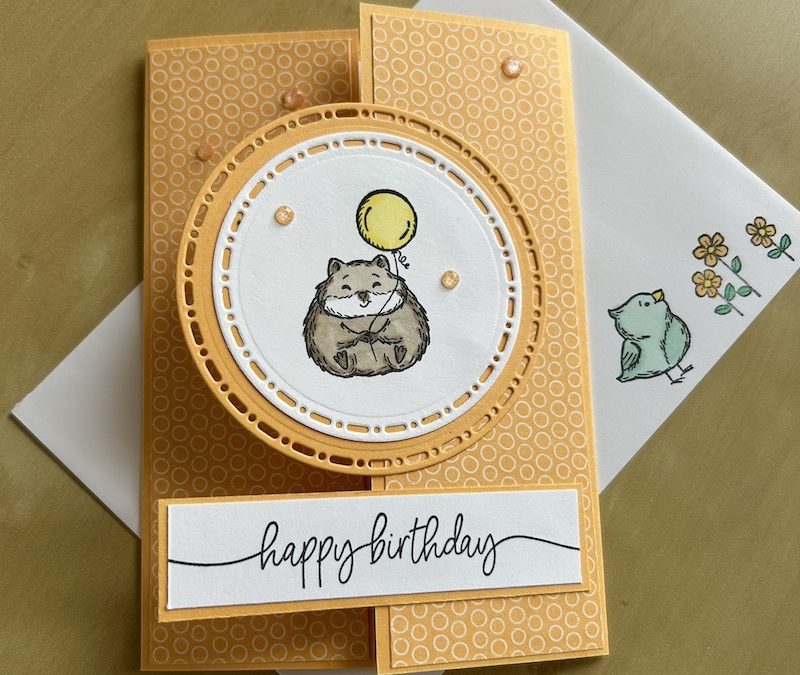
I’ve designed this card for an older child. It’s a fun fold card with hidden images/messages because I think most children (and grown-up children!) love interactive cards. I have used quite a lot of products, but all could be swapped for whatever you have in your stash.
The Fluffiest Friends stamp set, which usefully also has matching dies, allows you to make so many different types and styles of cute cards. I have teamed it up with the gorgeous Spotlight on Nature dies and added sentiments from So Sincere, Sweetly Scripted and Hearts & Hugs.
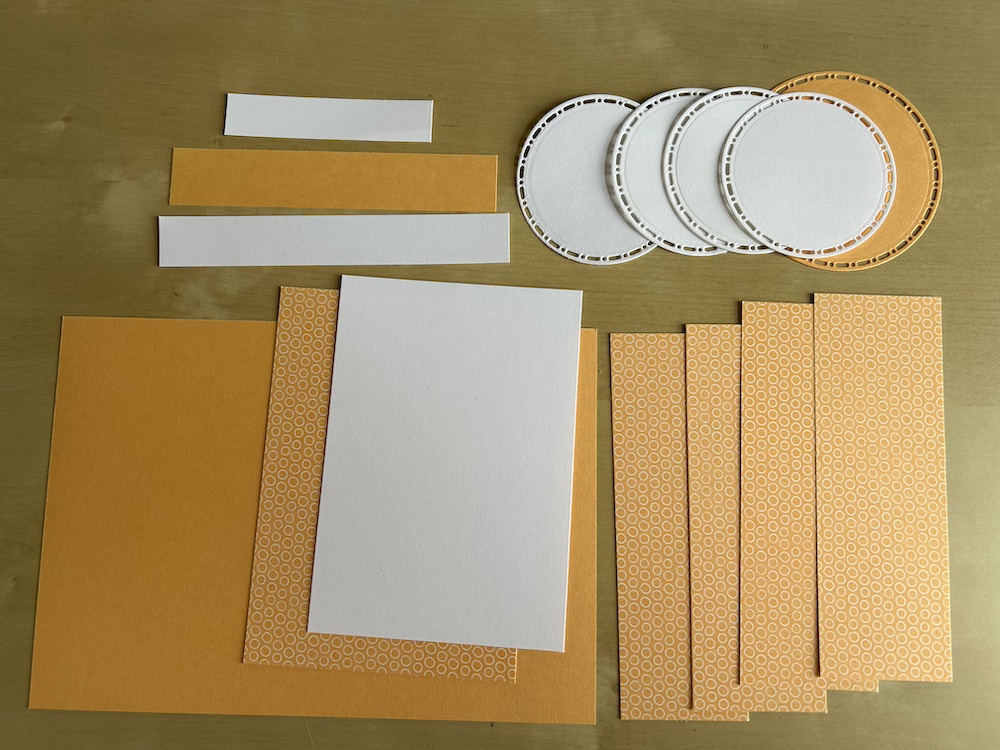
You will need:
- Base colour cardstock (I used Peach Pie): 21cm x 14.8cm (8 ½” x 5 ½”)
- DSP (I used 2024-2026 In Color) x 4: 4.9cm x 14.4cm (1 7/8″ x 5 ¼”)
- DSP panel: 10.1cm x 14.4cm (4” x 5 ¼”)
- Basic White panel: 9.5cm x 13.8cm (3 ¾” x 5”)
- Basic White squares x4: 7.5cm (3″) to cut Spotlight on Nature or punched circles
- Base colour cardstock square: 10cm (4″) to cut large Spotlight on Nature or punched circle
- Scraps of Basic White for front sentiments
- Scrap of colour cardstock for sentiment background
Die-cut four circles (or punch four 2 ½” circles) from the squares of Basic White. I used the third largest Spotlight on Nature die. Die-cut one second largest circle (or punch a 3″ circle) from the square of colour cardstock.
These are the pieces you should end up with:
Here are the instructions to make the card and/or you can watch the video towards the end of this post.
Score the base colour cardstock at 5.25 and 15.75 cm (2 1/8” and 6 3/8″). Fold each side inwards making sure the edges line up correctly and burnish.
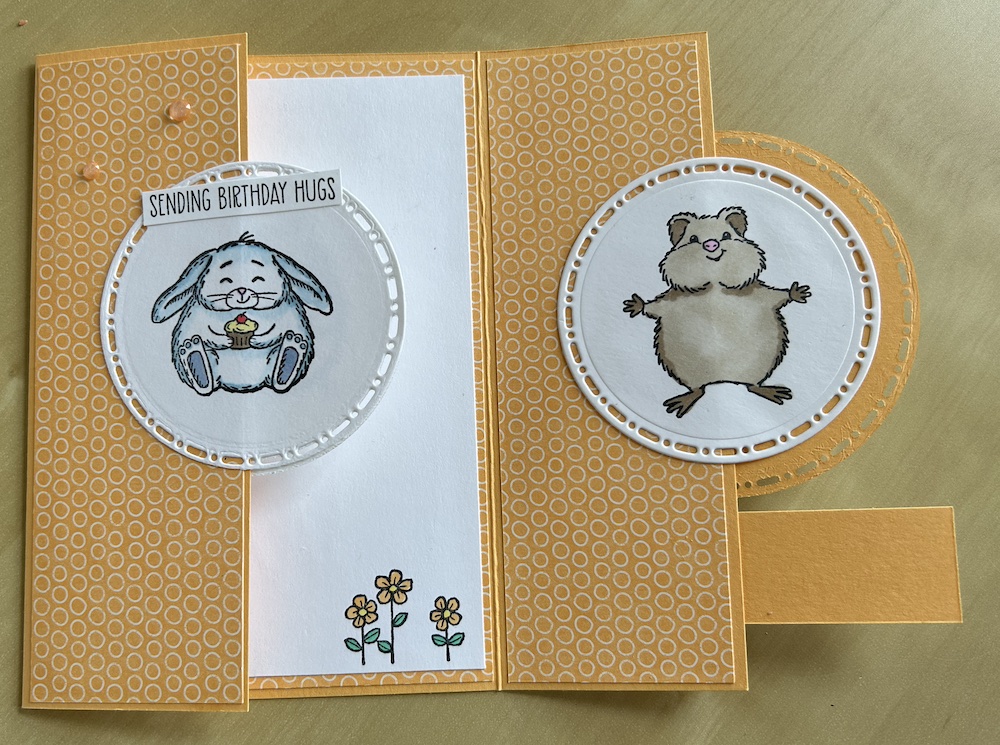
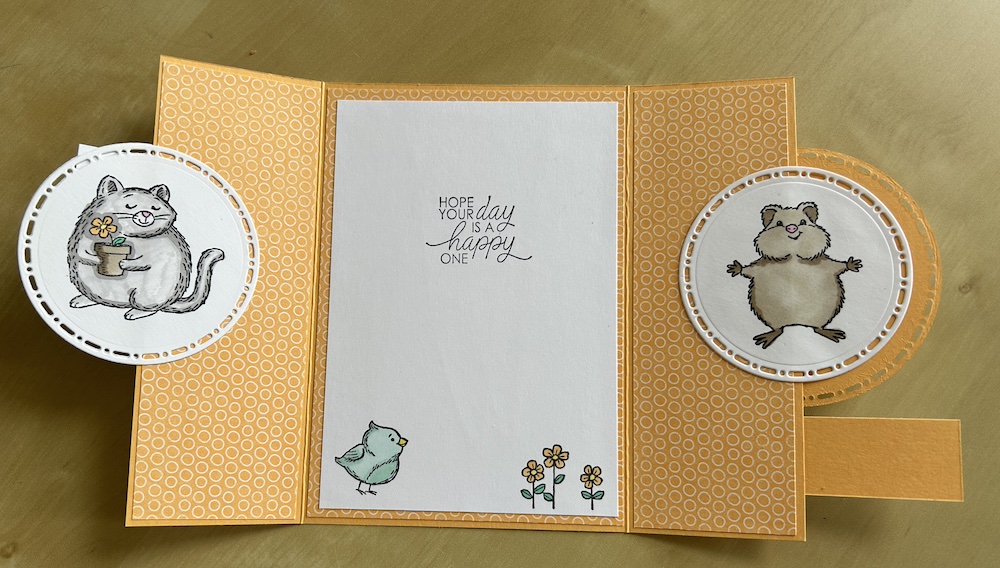
Stamp four images from the Fluffiest Friends or Hearts & Hugs stamp sets in Memento ink onto the four Basic White circles. Colour as you wish using Stampin Blends.
Stamp the Sweetly Scripted Happy Birthday onto the longer scrap of Basic White. Stamp Sending Birthday Hugs (Hearts & Hugs) on the smaller Basic White scrap. Trim as necessary.
Stamp the Hope your day is a happy one sentiment from So Sincere onto the Basic White panel and add any further decoration you want. I used the flowers and bird from Fluffiest Friends.
Adhere the large DSP panel inside the card then stick the completed Basic White panel on top.
Stick the DSP panels on the inside and outside of each flap.
Stick one circle to the left-hand flap, adding a second so it lies immediately behind the first circle.
Add the small sentiment above your circles.
Mount the front image circle to the coloured circle. Add to the right-hand flap so it covers the circle on the left-hand side. Stick the final circle on the rear of this flap.
Add the Happy Birthday scripted sentiment to the right-hand flap below your circles. Add a border using the colour cardstock strip behind any overlapping area(s) of the sentiment(s).
Add any gems you want to finish the card. Don’t forget to decorate your envelope!
This is what the card should look like when opened, the first panel then the second:
I made this card for kids in my Craft with Carol LIVE (join me every Tuesday at 2pm on YouTube and Facebook) – you can watch the video below:
You can find the links for all the products I used listed below.
Please now check out the wonderful cards made by my fellow T4S stampers via the links below.
See you again soon!
I hope you like this card and will have a go at making one – please show me what you come up with.
Thank you for taking the time to read my post.

Don’t forget – you get a FREE pdf when you place any order with me as your demonstrator. And, if your order is over £40, you will also get to choose stuff from my online shop to the value of your order!
Product List  | ||||
 |  |  |  |
")
")
")
")
 Designer Series Paper")


Such a cute card Carol. Love how you have mixed the two sets. TFS
I love your card Carol
Lovely card – a true labour of love! Tfs.
Carol, love your card! The animals are so cute!
How cute is this !
what a cute card ?
Super cute card Carol
I adore the card. These Spot On Nature dies are incredibly and so versatile.
Great fun fold card and a great use of the Spotlight on Nature dies.