It’s blog hop time again! This month’s theme is Birthdays. I make a lot of birthday cards for family and friends, but I’m always thinking about new ideas. I decided this month to use the gorgeous online exclusive Magnolia Mood bundle to make a card – and there will be more in future as I absolutely LOVE this bundle, it is so versatile with the different stamps and dies. Definitely one to get!

The Magnolia Mood stamp set, with its matching dies and additional patterned dies, allows you to make many different types and styles of birthday and other occasion cards. In fact, today on my Craft with Carol LIVE I got carried away and I actually made two cards – you can see the second card below in this blog and on the video.
Card 1: You will need:
- Basic White card: 21cm x 14.8cm (8 ½” x 5 ½”) for the base
- Old Olive panel 10cm x 14.3cm (4” x 5¼”)
- Basic White panel: 9.5cm x 13.8cm (3 ¾” x 5”)
- Basic White scrap approx 7.5cm (3″) square to cut Spotlight on Nature (or punch) circle
- Basic White scrap approx 9cm x 8cm (3 ½” x 3″) for the Magnolia floral stamp
- Gray Granite ink pad
- Old Olive and Lemon Lolly blends for colouring
Here are the instructions for how to make the card, or watch the video later in this post.
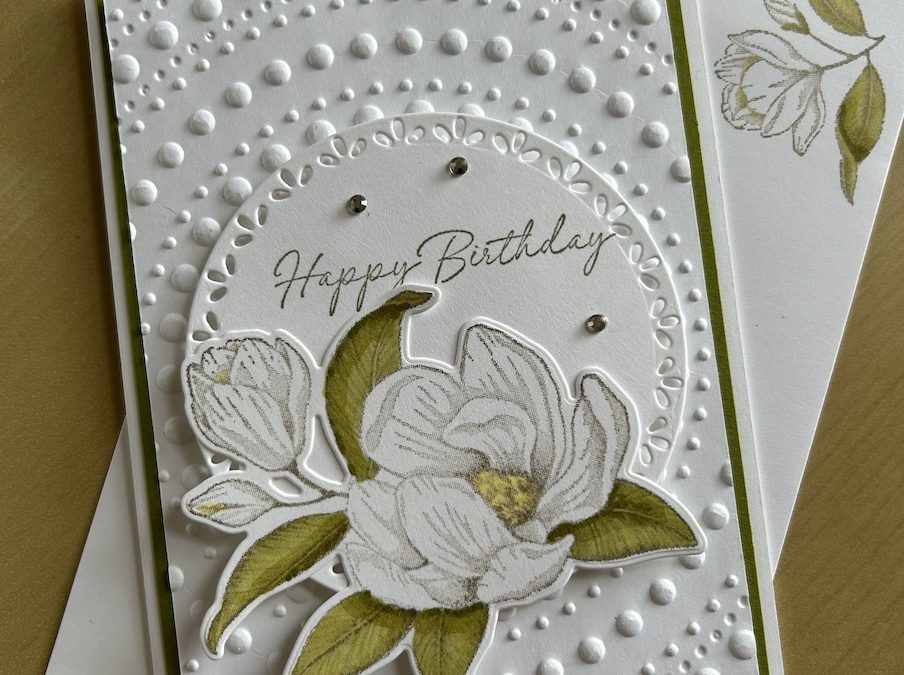
Score the base colour cardstock at 10.5cm (4¼”). Fold and burnish.
Emboss the Basic White panel. I used the Dotted Circles embossing folder.
Adhere the Old Olive then the embossed layer onto your card front.
Die cut the second largest Spotlight on Nature circle die (or use a 3″ punch) from Basic White cardstock.
Stamp the large floral image from the Magnolia Love stamp set in Gray Granite ink onto Basic White cardstock. Die cut out and colour as you wish using the Stampin Blends. The video shows how I coloured mine.
Stamp “Happy Birthday” in Gray Granite onto the top of the Basic White die cut /punched circle as shown. Add to the centre front of your card using dimensionals.
Stick the coloured floral image on top, adding glue only where it touches the die cut circle so that some leaves overlap the base card as shown.
Stamp a sentiment inside the card and add the small floral image to the bottom right using Gray Granite. I stamped the same image onto my envelope too. Colour using your blends.
Add any gems you want to finish the card.
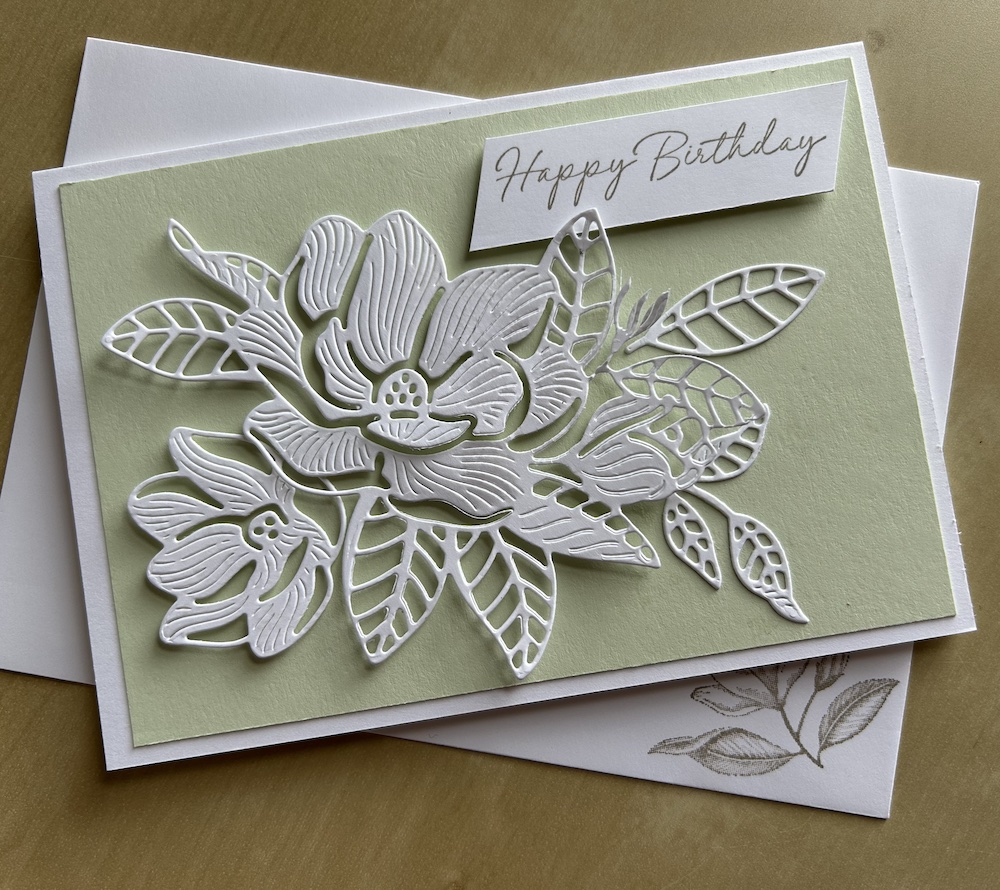
I love this set so much that I also wanted to make a card showing the gorgeous detailed dies. For this second card, I die cut the detailed dies from Basic White and added them, using dimensionals behind the leaves, onto a Soft Sea Foam panel. The sentiment is stamped in Gray Granite, trimmed, and added to the card using dimensionals. I decorated the inside of the card and envelope in the same way as for the card bove but without adding any further colour.
I made these two Magnolia Mood birthday cards in my Craft with Carol LIVE today (join me every Tuesday at 2pm on YouTube and Facebook) – you can watch the video below:
You can find the links for all the products I used listed below.
Please now check out the wonderful cards made by my fellow T4S stampers via the links below.
See you again soon!
I hope you like this card and will have a go at making one – please show me what you come up with.
Thank you for taking the time to read my post.

Don’t forget – you get a FREE pdf when you place any order with me as your demonstrator. And, if your order is over £40, you will also get to choose stuff from my online shop to the value of your order!
Product List  |  | |||
 |  |  |  |  |
")


beautiful cards beautifully done ?
Your card is beautiful, I will be trying that technique. Sorry but Google won’t let me sign in to leave a comment directly.
Love your card! So elegant!
aww I’ve missed this one, such an elegant card
Stunning as always. tfs.