
In today’s video, I show you how to make a simple aperture pop-up card. I used the gorgeous Season of Green and Gold speciality Designer Series Paper and coordinating Very Vanilla cardstock. The sentiment shows through the aperture and there is space to write a message on the side panel.
Here is the front of the card:

Here is the inside showing the aperture with the sentiment showing through:
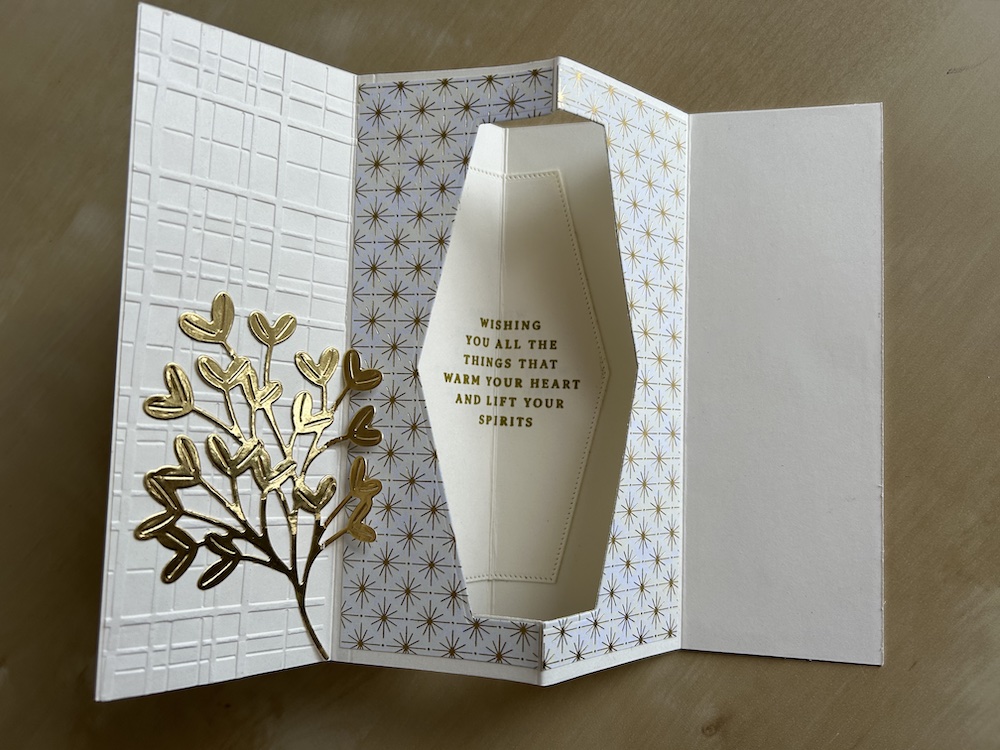
I’ve used quite a bit of gold foil for this card as you can see! The instructions and measurements are shown in the video or given below if you prefer.
To make the card you will need:
- Very Vanilla thick cardstock base: 21cm x 14.8cm (8½” x 5½”)
- Very Vanilla cardstock: 21cm x 14.8cm (8½” x 5½”)
- Season of Green & Gold DSP x2: 10cm x 14.3cm (4” x 5¼”)
- Very Vanilla cardstock: approx 7cm (3″) square for front panel decoration
- Gold foil: approx 14cm x 16cm (5″ x 6″)
- Wild Wheat ink pad
- Forever Plaid 3D embossing folder
Score the thick Very Vanilla card base at 10.5cm (4¼”). Fold and burnish.
Score the Very Vanilla cardstock at 5.25cm, 10.5cm and 15.75cm (2 1/8”, 4¼” and 6 3/8″). Fold in a W shape – the centre fold as a mountain fold and the two side folds as valley folds. The centre fold will form the pop-up.
Cut one piece of DSP in half at 5cm (2″). Stick the other DSP piece on the front of your base card.
Use removable adhesive (available from Amazon) on the outside of each centre panel of the pop-up card piece. Stick one half of the cut DSP to each side.
Use a suitable die – I used the largest diamond-shaped die from the Nested Essentials die set – to die-cut the centre out of your pop-up card to form the aperture. A large rectangular die would also work well. Remove the spare cut-out pieces of DSP – I kept these to use in another project.
Stamp your sentiment in Wild Wheat ink to the centre of the cut-out card piece.
Lay the inside pop-up panel over the inside of your card ensuring you line it up well. This shows where the cut-out panel needs to be replaced. Stick this sentiment panel down to the back of the card. The folds should line up perfectly and the sentiment will show through the aperture.
Stick the DSP pieces down properly to the sides of the cut-out panels. Tip: lift the top then the bottom to add glue without removing them so they stay lined up. See the video for details.
If you wish, emboss the left-hand panel of the pop-up aperture piece. I used the Forever Plaid 3D embossing folder. This is not essential however! You could stamp it instead of you wish. Leave the right-hand panel clear for writing a message.
Add glue to the reverse of the left and right-hand panels. Line up with the base card and stick down.
Die-cut the large square frame from the Peaceful Season bundle from the Very Vanilla square. I then turned it to use as a diamond shape. Use the embossing buddy then stamp “Merry” in Versmark and heat emboss using Gold embossing powder. Stick the completed panel to the front of the card as shown in the pciture above.
Die-cut the Peaceful Season “Christmas” outline from a Very Vanilla cardstock scrap and the Christmas word from Gold Foil. Stock these together. See the video for my tips on lining up the word to the outline and how to ensure the dot on the “i” is not forgotten! Stock the compekted work to the card front using dimensionals as shown in the picture.
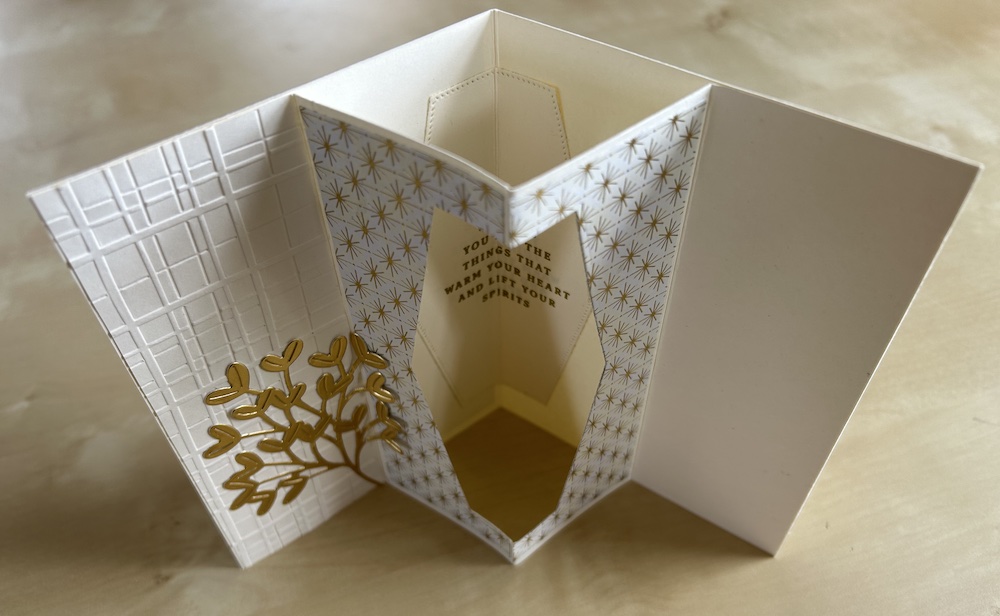
Die-cut various fronds from the Golden Greenery dies from Gold Foil. Use these to decorate the front and inside of your card as you wish. And voilá – your simple aperture pop-up card is complete. Here’s what it looks like standing up:
Don’t forget to stamp your envelope! I used the Golden Greenery frond stamp in Wild Wheat.
I hope you like this card and will have a go at making one – please show me what you come up with.
Thank you for taking the time to read my post.

Don’t forget – you get a FREE pdf when you place any order with me as your demonstrator. And, if your order is over £40, you will also get to choose stuff from my online shop to the value of your order!
Product List ![Golden Greenery Bundle [ 164117 ]](https://assets1.tamsnetwork.com/images/EC042017NF/164117s.jpg "Golden Greenery Bundle [ 164117 ]") | ![Peaceful Season Bundle (English) [ 164021 ]](https://assets1.tamsnetwork.com/images/EC042017NF/164021s.jpg "Peaceful Season Bundle (English) [ 164021 ]") | ![Nested Essentials Dies [ 161597 ]](https://assets1.tamsnetwork.com/images/EC042017NF/161597s.jpg "Nested Essentials Dies [ 161597 ]") | ![Gold Foil Sheets [ 132622 ]](https://assets1.tamsnetwork.com/images/EC042017NF/132622s.jpg "Gold Foil Sheets [ 132622 ]") | |
![Forever Plaid 3 D Embossing Folder [ 164049 ]](https://assets1.tamsnetwork.com/images/EC042017NF/164049s.jpg "Forever Plaid 3 D Embossing Folder [ 164049 ]") | ![Very Vanilla A4 Card Stock [ 106550 ]](https://assets1.tamsnetwork.com/images/EC042017NF/106550s.jpg "Very Vanilla A4 Card Stock [ 106550 ]") | ![Metallics Wow! Embossing Powder [ 165678 ]](https://assets1.tamsnetwork.com/images/EC042017NF/165678s.jpg "Metallics Wow! Embossing Powder [ 165678 ]") | ||
![Stampin' Cut & Emboss Machine [ 149653 ]](https://assets1.tamsnetwork.com/images/EC042017NF/149653s.jpg "Stampin' Cut & Emboss Machine [ 149653 ]") | ![Heat Tool - Uk Plug [ 129054 ]](https://assets1.tamsnetwork.com/images/EC042017NF/129054s.jpg "Heat Tool - Uk Plug [ 129054 ]") |
![Season Of Green & Gold 12" X 12" (30.5 X 30.5 Cm) Specialty Designer Series Paper [ 164324 ]](https://assets1.tamsnetwork.com/images/EC042017NF/164324s.jpg "Season Of Green & Gold 12\" X 12\" (30.5 X 30.5 Cm) Specialty Designer Series Paper [ 164324 ]")
![Wild Wheat Classic Stampin' Pad [ 161651 ]](https://assets1.tamsnetwork.com/images/EC042017NF/161651s.jpg "Wild Wheat Classic Stampin' Pad [ 161651 ]")
![Very Vanilla A4 Thick Cardstock [ 144238 ]](https://assets1.tamsnetwork.com/images/EC042017NF/144238s.jpg "Very Vanilla A4 Thick Cardstock [ 144238 ]")

