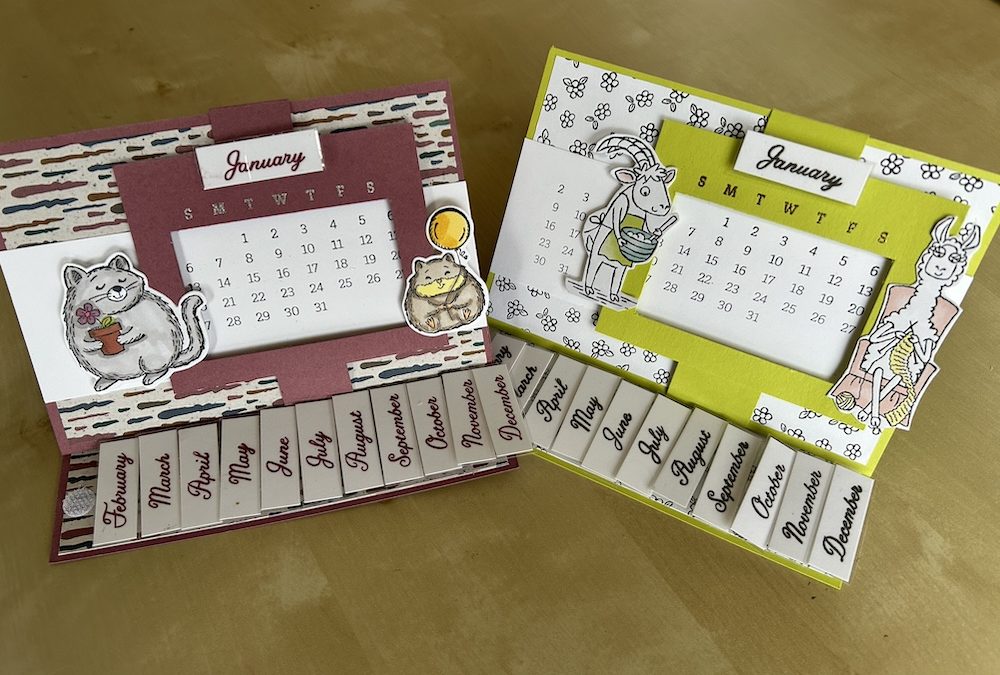
Most calendars last for just one year, but it can be useful to have a calendar that you can use for as long as you want. This perpetual calendar allows you to adjust each month to show the appropriate dates for any year you wish.
I first saw this idea a few years ago from a US demo, Jessica Lewis and made one for myself. This year it was time for a new one, so here it is!
The Days to Remember stamp set from the annual catalogue is perfect for making your own calendars and works brilliantly for this one. It is perpetual because you just change the month tab and slide the window over the dates you need each time.
You will need:
- Base colour cardstock 8″ x 6″ (20.5cm x 15.5cm)
- Top piece colour cardstock 6″ x 4″ (15.5cm x 10.3cm)
- Basic White cardstock 6″ x 2″ (15.5cm x 5cm)
- DSP (2 pieces) 5 3/4″ x 3 3/4″ (14.5cm x 9.8cm)
- Frame colour cardstock 3 3/4″ x 3″ (9.8cm x 7.5cm)
- Belly band colour cardstock 6 1/2″ x 1″ (17cm x 3cm)
- Basic White cardstock 6″ x 1/2″ (15.6cm x 4cm) cut into 1/2″ (1.3cm) strips
- Laminating pouch
- Velcro dots
- Stamps and Basic White cardstock scraps for decoration
- Prepare a window frame template from scrap cardstock 2 3/4″ x 1 5/8″ (7cm x 4.2cm)
The instructions are given below and here is my video showing you how to make the perpetual calendar:
Score the base cardstock on the long side at 4″ and 6″ (10.25cm and 15.5cm). Fold both score lines as mountain folds.
Glue your DSP pieces one to the base and one to the top cardstock piece.
Stamp the Days to Remember numbers across the piece of Basic White cardstock.
Take your frame and use your window template to mark the window, placing it approximately 3/8″ (0.5cm) from the bottom and side edges. Use your paper trimmer to cut out the window.
Choose which day strip you wish to use. Rub the card with your embossing buddy then stamp the day strip in Versamark just above the window you have cut out. Emboss in gold or silver to match the cardstock you have chosen.
Wrap the belly band around the top piece card quite tightly but so that it moves fairly easily. use your prepared window to work out where to bend it. Use tear’n’tape to stick the window piece to the belly band.
Fix the top piece card to the base using tear’n’tape only at each edge. Be careful NOT to put any glue or tape in the middle or your window won’t move!
Stamp each month on the small strips of Basic White card in a colour to match your colour scheme. Place in the laminating pouch and laminate then. cut out carefully.
Add velcro dots to the back of each month and stick to your card base, starting level with the left hand side and placing them adjacent to each other – they will then fit. Add a velcro dot to the window frame above your day strip.
Stamp your required image(s) and cut out. Stick it/them to the side(s) of your window. Your calendar is complete!
I hope you like this project. Please let me know in the comments below and get in touch if you need any further help. Sign up for my regular emails to find out when my online craft sessions are. You will also get a free pdf gift with instructions to make three different cards and a pop-up gift holder.
Product List


