
I love to give small gifts and I also love making the boxes to give them in! This slim box doesn’t require any cutting or glue to make but is an unusual shape. I have made these in different sizes before, but this is the largest one and will hold a small gift or several large sweets. It pulls open at the top.
I’ve used some retired cardstock and DSP for my box. You can choose whatever cardstock and coordinating DSP you have to hand. Oh, you do need glue to attach the DSP of course, but the box doesn’t use any!
The available space inside the box is shaped and measures 5cm (2″) score to the base and 2.5cm (1″) across the top and is 5cm (2″) deep. I’ve given the instructions here or/and you can watch the video below to see how to make it up.
You will need:
- Coloured cardstock 20cm x 28cm (8″ x 11″)
- Coordinating DSP 2cm x 17cm (3/4″ x 6 3/4″)
- Coordinating DSP (x2): 4.5cm x 17cm(1 3/4″ x 6 3/4″)
- Coordinating DSP (x2): 4.5cm x 4.5cm (1 3/4″ x 1 3/4″)
- Coordinating DSP (x2): 2cm x 4cm (3/4″ x 1 3/4″)
- Scraps for decoration
Trim your piece of A4 cardstock to 20cm x 28cm (8″ x 11″)
Score on the LONG side at 5cm and 23cm (2″ and 9″)
Score on the SHORT side at 2.5cm, 7.5cm, 12.5cm and 17.5cm (1″, 3″, 5″ and 7″)
Using your scoring tool with a soft mat underneath, score diagonal lines from the first score lines junction on either side up to the top of the next score line as shown in the picture below:
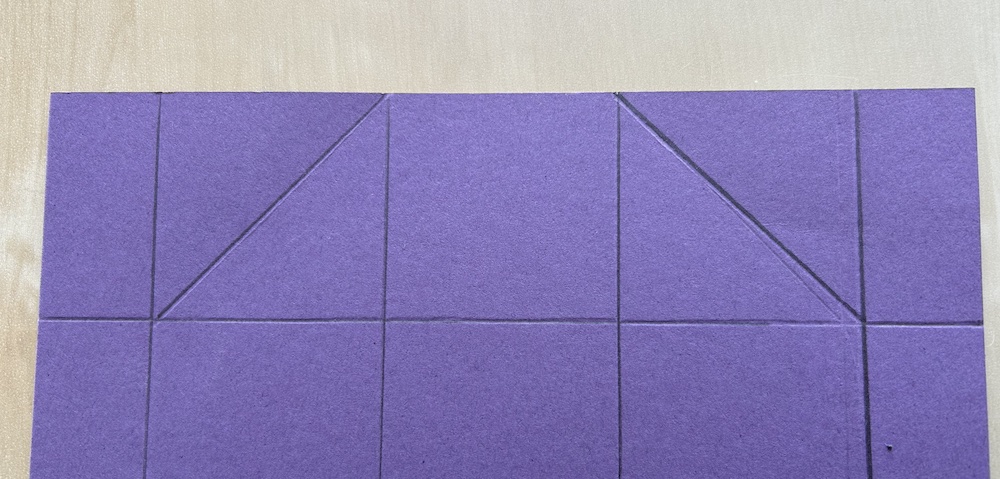
Repeat these diagonal score lines at the other end of your box.
Fold inwards from the long side on each score line. Gently ease the diagonal score lines inwards – see the video if you are unsure about this:
Here’s where you will need some glue! Stick the longer two wide pieces of DSP to the outer two wider panels and the thinner long piece to one of the edge panels. Add the two 2cm x 4cm (3/4″ x 1 3/4″) either side of the thin long piece at one edge.
Turn your cardstock over (important!) and stick the two square pieces of DSP to the middle square panel at each side.
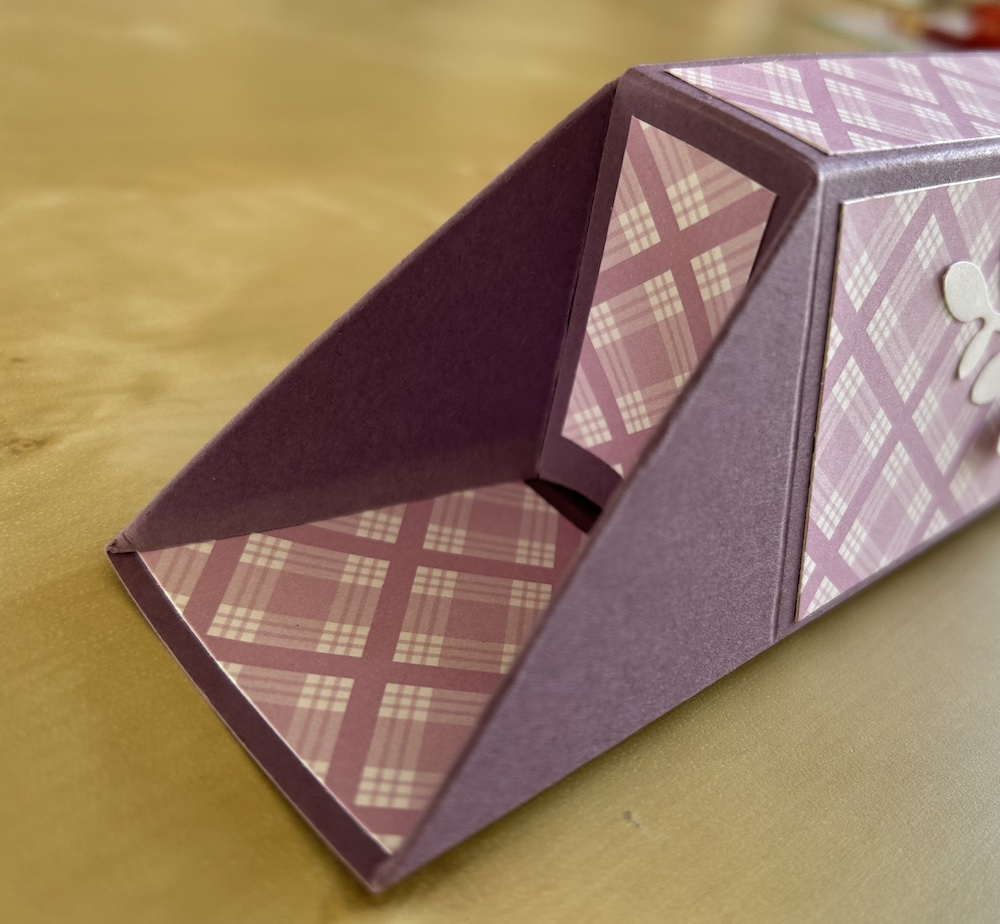
Bring the box together with the thinner non-decorated part at the top. Fold down each end carefully inwards so that the triangular panel is folded down at the side and the edge panel sits vertically. Then bring the decorated top piece to overlap the thinner non-decorated panel and fold each end inwards again, folding the edge on top of the first edge. The box will hold closed together without the need for any glue. The ends should look like this:
Decorate your box as you wish. I used some Basic White fronds punched using my Bough punch stuck to one outside panel. I added a thank you sentiment from the Irresistible Blooms stamp set and die cut it using a Something Fancy die. I used dimensionals to add it to my box.
These boxes are fun to make and easy once you get the hang of the diagonal scoring! I hope you have a go.
Thank you for taking the time to read my post.

Don’t forget – you get a FREE tutorial of eight cards when you place an order with me. There’s a different set every month. And, if your order is over £40, you will also get to choose stuff from my online shop to the value of your order!
Product List  |  |
")


