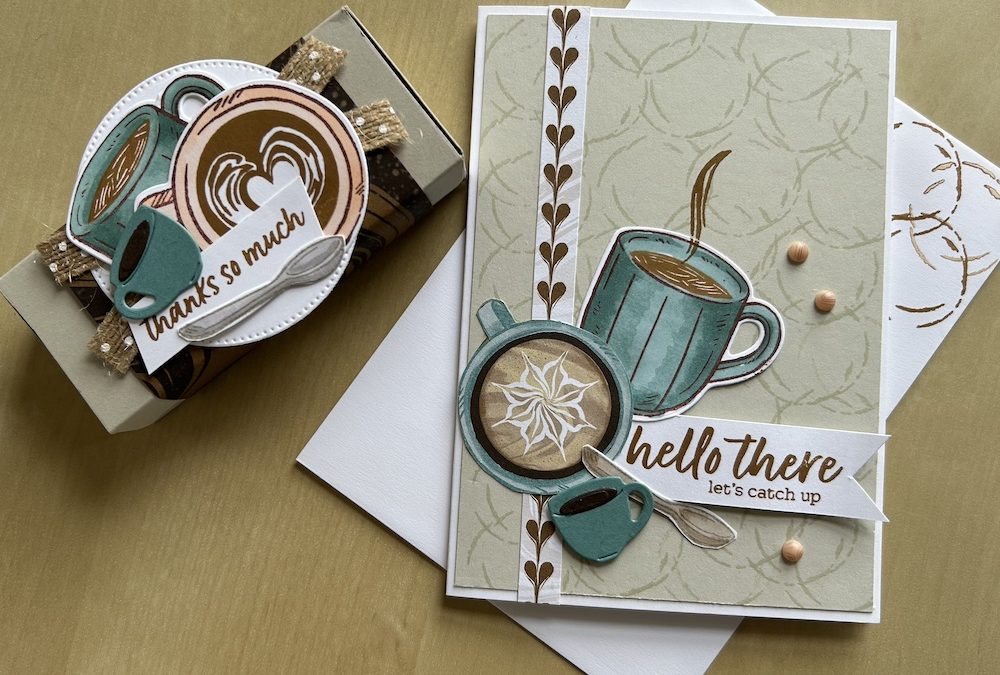
I just love this A Little Latte suite, which is not in the new catalogue, but can be found as an online exclusive while stocks last. It has a gorgeous coffee based stamp set and dies, beautiful DSP, fabulous gems and natural polka dot ribbon.
In my in-person class this week I used it to make a coffee gift box and card set. The gift box will hold coffee, dried milk and sugar sachets and one or two Lotus Biscoff biscuits.
I used everything from the suite – the stamps, the dies, the DSP, the ribbon and the self-adhesive swirl dots to make the card and everything except the self-adhesive dots to make the gift box. But if you prefer, you could use these ideas to make this card and gift box set with any other suite of products you happen to own.
Watch this video to see how to make the coffee gift box and card. Full instructions are also given below.
TO MAKE THE CARD:
You will need:
- Basic White cardstock base 21cm x 14.8cm scored at 10.5cm (8 ½” x 5 ½” scored at 4 ¼”)
- Basic Beige layer 10cm x 14.3cm (4” x 5 ¼”)
- Strip of coffee art DSP one pattern wide and 15-16cm long
- Scraps of Basic White for stamping mug, spoon and sentiment
- Scraps of Lost Lagoon and Early Espresso for die cutting cup and coffee insert
- Pecan Pie and Crumb Cake stamping pads
Stamp the coffee mark circles randomly across the Basic Beige layer – as much or as little as you want. I got carried away in the video! Stick the completed layer to your card front.
Adhere the DSP coffee art strip down the left-hand side of the card as shown. Trim if necessary.
Die cut out two small coffee cups and two matching coffee inserts. Stick the inserts into the cups by putting a dab of glue onto the cup then adding the coffee insert using your Take a Pick tool to avoid getting sticky fingers! (NOTE: One of these cups is for the box.)
Stamp the mug and the spoon on a scrap of Basic White. Add a stamped coffee insert into the mug using Pecan Pie ink. Colour the mug using Lost Lagoon Stampin Blends and colour the spoon using Crumb Cake blends. Die or fussy cut the mug and spoon.
Die cut a Lost Lagoon edged coffee art cup from the A Little Latte DSP.
Stamp the sentiment in Pecan Pie onto a scrap strip of Basic White. Curl using your bone folder as shown in the video. Cut the right-hand end into a flag/banner shape. Stick the completed sentiment next to the strip near the bottom of the card.
Stick the mug onto the card front as shown in the picture. Stamp the steam in Pecan Pie coming out of the mug, hopefully the right way up, unlike me!
Stick the cut out coffee art cup and the spoon onto the card, then add the die-cut small coffee cup using dimensionals.
Finish the card by adding three self-adhesive swirl dots.
I stamped the coffee marks as a decoration inside the card and on the envelope using Pecan Pie ink, stamping off one of the three images.
TO MAKE THE BOX:
You will need:
- Basic Beige cardstock square 15cm x 15cm (6″ x 6″)
- Strip of DSP approx 7cm x 18cm (3″ x 7″)
- Basic White cardstock approx 7.5cm x 15cm (3″ x 6″)
- Ribbon strips x 2: 9cm long (3 1/2″)
- Early Espresso and Pecan Pie ink pads
- Various stamping Blends of your choice.
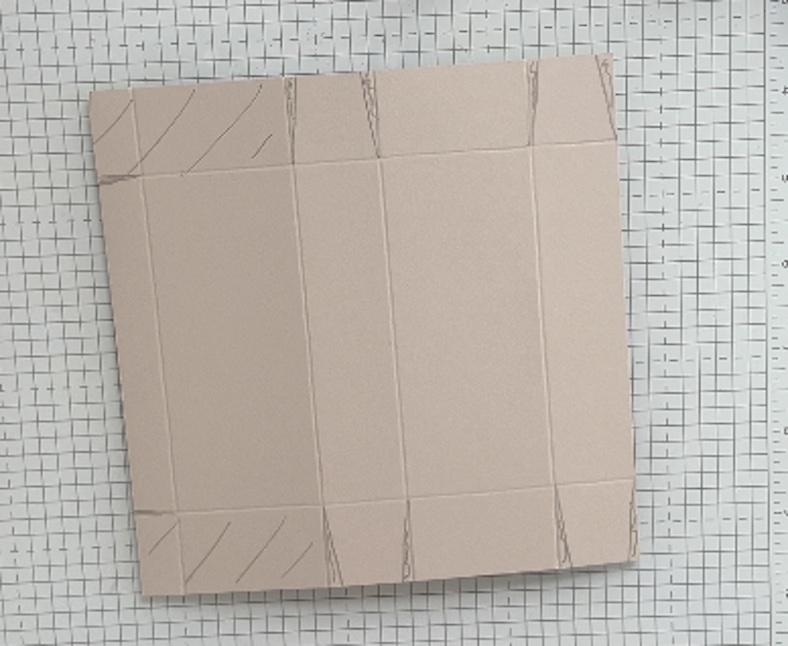
Score the Basic Beige square on one side at 2.5, 7, 9.5, 14cm (1, 2 ¾ , 3 ¾ , 5 ½ ″).
Turn through 90 degrees and score at 2.5 and 12.5cm (1, 5″)
Fold and burnish the score lines then cut the scored piece as shown below, taking out the pieces marked in pencil. Round off the tips of the small panel. See the video if you are not sure about this.

Make up the box by glueing the tabs to the inside of the second panel, making sure the corners are square. The lid folds over. You can tuck it in, but because you are making a belly band it can be left outside.
Wrap the DSP around the box keeping it snug but not tight. Glue the ends beneath the box. Check it slides on and off the box easily.
Add the two strips of ribbon crosswise across the top of the box using Tear & Tape.
Die cut the second largest Stylish Shapes circle from Basic White and stick to the centre top of the box.
Stamp the coffee mug and coffee cup top in Early Espresso and the inserts in Pecan Pie. Stamp the spoon in Grey Granite. I coloured the mug in Lost Lagoon, the coffee cup in Petal Pink and the spoon in Grey Granite, but you can choose what colours you want.
Stamp your sentiment in Pecan Pie on a scrap of Basic White. Trim the edges on the angle to match the words.
Add these elements on top of the Basic White circle as you wish. I added the mug to the left, the large face-up coffee cup to the right and the sentiment on the bottom left, then added the second small coffee cup you made on the left wing dimensionals and finally I stuck the spoon across the bottom.
I hope you like this coffee gift box and card. I will be making a few to give to my friends, filled with coffee and sugar sachets and Biscoff biscuits!
Thank you for taking the time to read my post.

Don’t forget – you get a FREE tutorial of eight cards when you place an order with me. There’s a different set every month. And, if your order is over £40, you will also get to choose stuff from my online shop to the value of your order!
Product List


