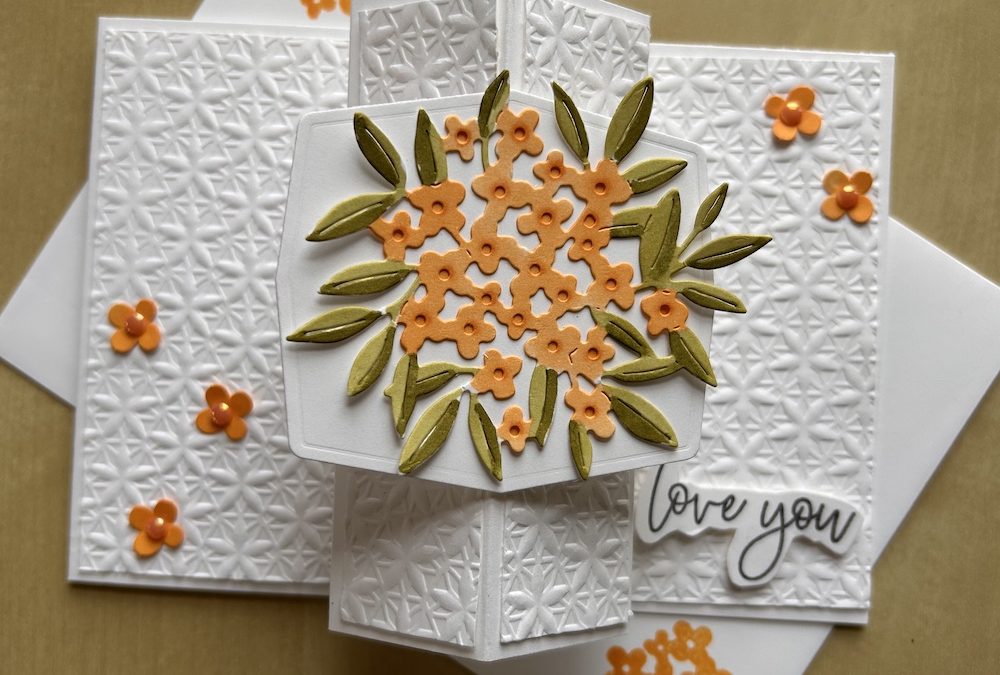
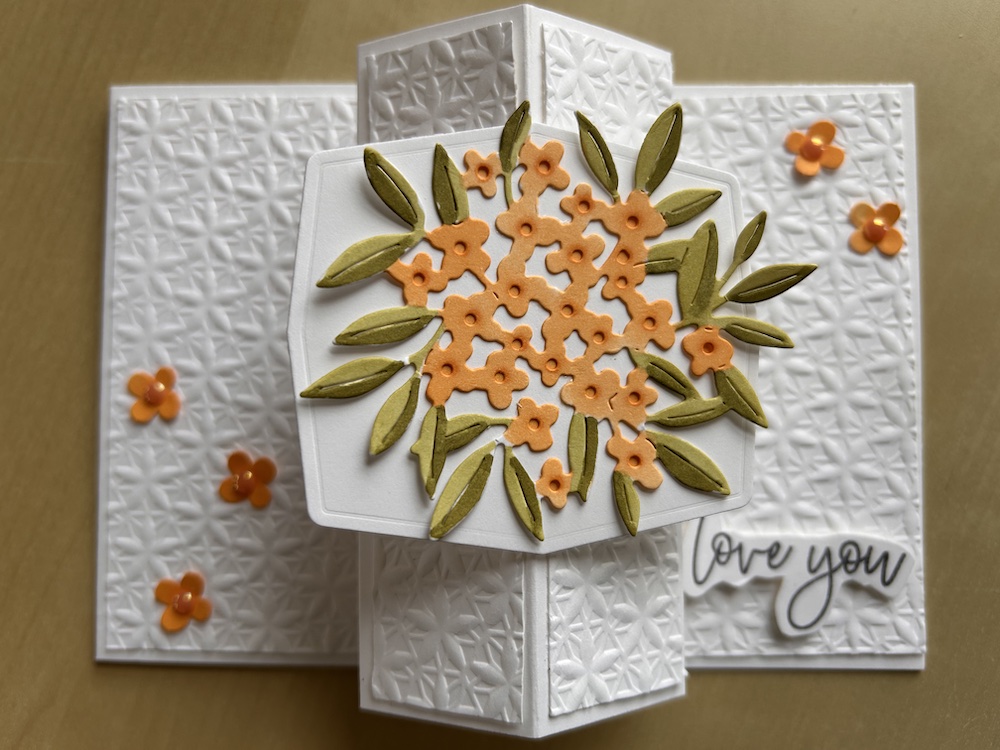
This month’s Build & Bloom Stampers blog hop theme is Floral. I love fun fold cards and I recently saw a centre column card from Sue Campfield, a US demonstrator. I have adapted the card for UK measurements. This card has a centre pop up column with a gorgeous floral centrepiece. I’ve used the lovely Fabulous Florals bundle (March exclusive) to make this card, together with the floral Basics embossing folder. You could use any floral image you have for the centre.

This floral card has a pop-up column that stands proud from the card, but it folds flat for posting.

To make this card you will need:
- Basic White card base 10.5cm x 29.6cm scored at 14.8cm (11” x 4¼” scored at 5½”)
- Basic White for column: 14cm x 10.5cm (4¼” x 6″)
- Basic White embossed or DSP for front layer: 14cm x 10cm (4” x 5¼”)
- Basic White embossed or DSP for columns (x4) : 10cm x 2.6cm (4″ x 1 1/8″)
- Tabs of Basic White for adding front layer (x2): approx 1″ x 2″, scored in half at 1″
- Scrap of Basic White for sentiment
- Scraps and gems for decoration
Instructions
Score and burnish the card base.
Score the column piece on the long side at 1cm, 4 cm, 7cm, 10cm and 13cm (½”, 1¾”, 3″, 4¼” and 5½”)
Fold and burnish all folds, with the tab folds outwards and the other folds inwards.
(If you wish, decorate the back two columns with embossed card or DSP before adhering to your card, though you can add these after adhering the column to the card base.)
Mark a centre line on the card front at 7.4cm (2¾”) with a pencil through your trimmer channel in the centre of the card.
Add tear & tape to the tabs. Stick the first tab down exactly parallel to the centre mark.
Fold the column closed with the second tab folded back and press down to secure it in place. See the video if you are unsure.
Cut the front layer in half at 7cm (2¾”) and stick each side onto your card front – this hides the tabs.
Take your Basic White tabs and adhere them on either side of the centre fold on your column.
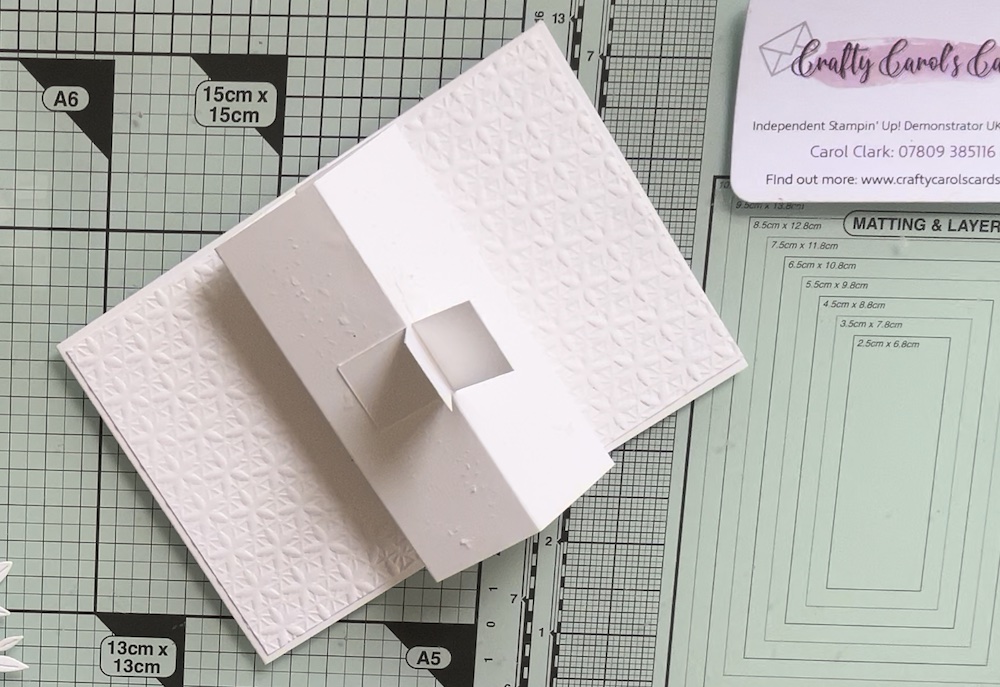
Finish adding the embossed card or DSP strips to the column.
Die-cut the Forever Florals flower cluster and the largest frame from Basic White.
Colour the flowers and leaves – I used Peach Pie and Old Olive blends, but they can be any colour you want.
Stick this piece flat to the frame, then add the frame to the card front by adding adhesive to the tabs. (I added some dark Peach Pie blend centres to my flowers once stuck to the frame.)
Stamp your chosen sentiment on a scrap of Basic White and fussy cut. Add to the card using dimensionals. Note: make sure it does not interfere with the column lying flat for posting.
Add some extra flowers and gems as you wish to complete the card decoration.
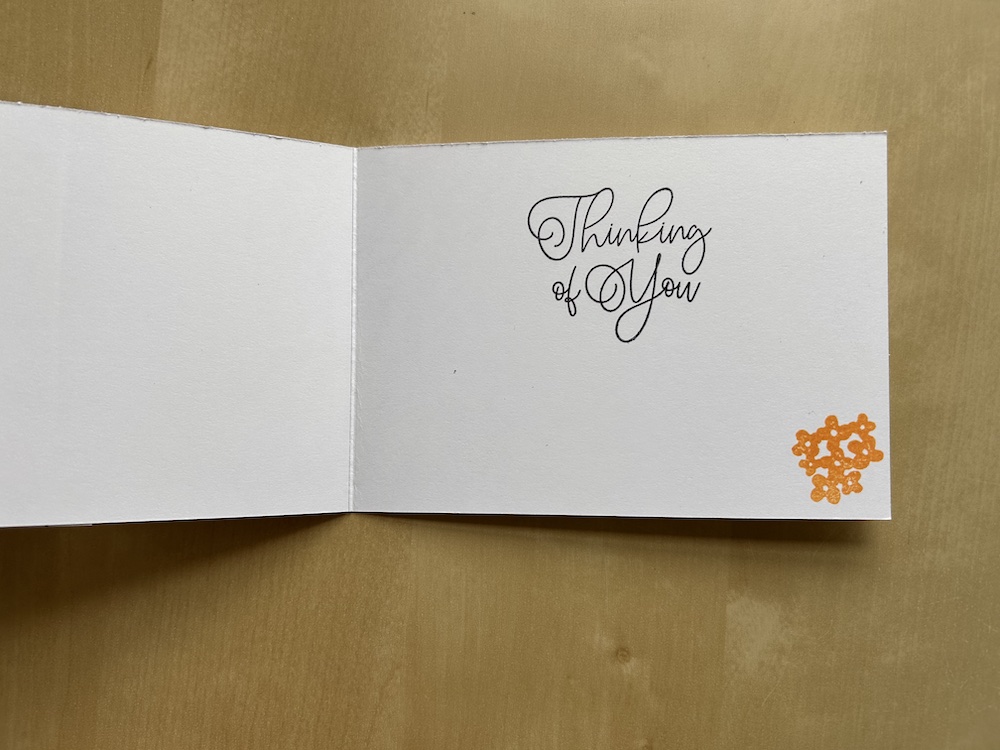
Stamp an image and a sentiment inside the card.
Don’t forget to decorate your envelope! I used the small flower cluster stamp on my envelope.
Here is the video of me making this card:
Here is the original column card I made for my husband for Valentines Day:
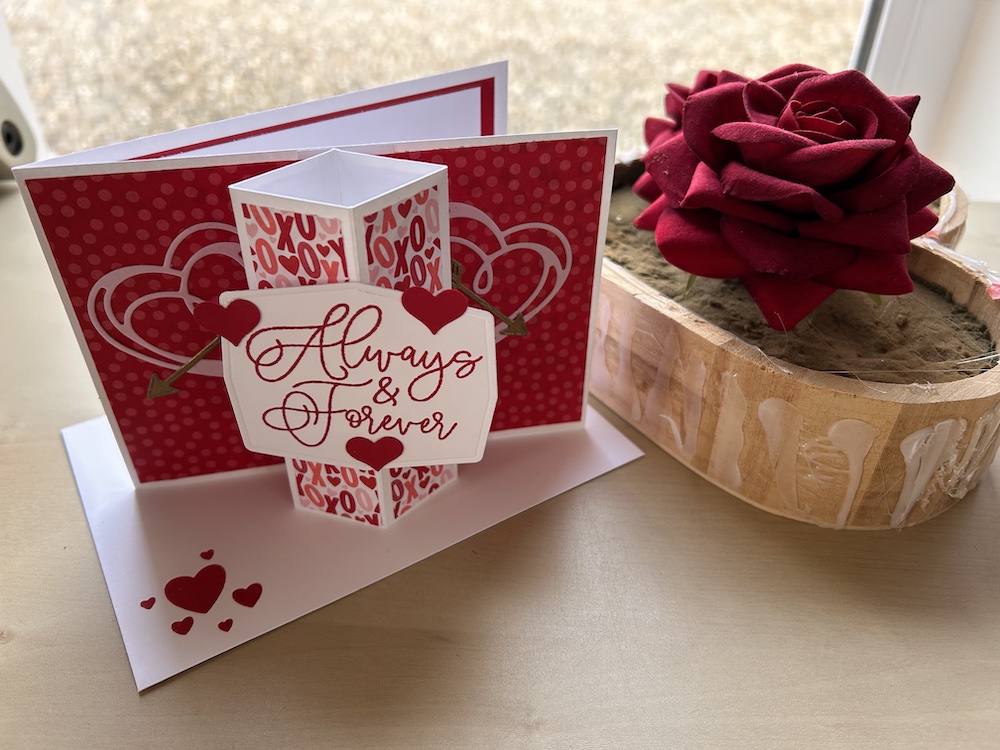
You can get a free pdf on how to make this love card in my online shop.
Because the stamp set I used for my floral card is not available until March, I have added the products for the Valentine’s Day card below.
Please now go and look at the other gorgeous cards my fellow blog hoppers have made using the links below.
I hope you like this card and will have a go at making one – please show me what you come up with.
Thank you for taking the time to read my post.

Don’t forget – you get a FREE pdf when you place any order with me as your demonstrator. And, if your order is over £40, you will also get to choose stuff from my online shop to the value of your order!
Product List ![Endless Love Bundle (English) [ 167062 ]](https://assets1.tamsnetwork.com/images/EC042017NF/167062s.jpg "Endless Love Bundle (English) [ 167062 ]") | ![Endless Love Dies [ 167061 ]](https://assets1.tamsnetwork.com/images/EC042017NF/167061s.jpg "Endless Love Dies [ 167061 ]") | |||
![Basic White A4 Cardstock [ 166781 ]](https://assets1.tamsnetwork.com/images/EC042017NF/166781s.jpg "Basic White A4 Cardstock [ 166781 ]") | ![Flirty Flamingo A4 Cardstock [ 141421 ]](https://assets1.tamsnetwork.com/images/EC042017NF/141421s.jpg "Flirty Flamingo A4 Cardstock [ 141421 ]") | ![Metallics Wow! Embossing Powder [ 165678 ]](https://assets1.tamsnetwork.com/images/EC042017NF/165678s.jpg "Metallics Wow! Embossing Powder [ 165678 ]") | ![Paper Trimmer [ 152392 ]](https://assets1.tamsnetwork.com/images/EC042017NF/152392s.jpg "Paper Trimmer [ 152392 ]") | ![Basics 3 D Embossing Folders [ 161598 ]](https://assets1.tamsnetwork.com/images/EC042017NF/161598s.jpg "Basics 3 D Embossing Folders [ 161598 ]") |
![Endless Love Photopolymer Stamp Set (English) [ 167055 ]](https://assets1.tamsnetwork.com/images/EC042017NF/167055s.jpg "Endless Love Photopolymer Stamp Set (English) [ 167055 ]")
![Made With Love 12" X 12" (30.5 X 30.5 Cm) Designer Series Paper [ 167054 ]](https://assets1.tamsnetwork.com/images/EC042017NF/167054s.jpg "Made With Love 12\" X 12\" (30.5 X 30.5 Cm) Designer Series Paper [ 167054 ]")
![Real Red 12" X 12" (30.5 X 30.5 Cm) Two Tone Cardstock [ 166696 ]](https://assets1.tamsnetwork.com/images/EC042017NF/166696s.jpg "Real Red 12\" X 12\" (30.5 X 30.5 Cm) Two Tone Cardstock [ 166696 ]")

