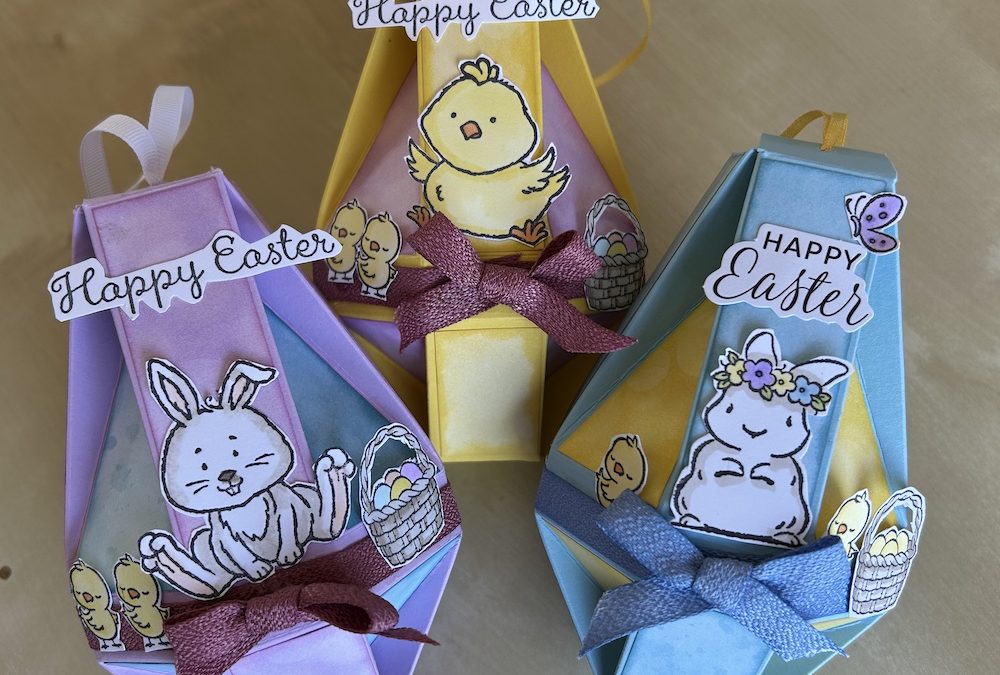
Want to make something special to hold an Easter Egg this Easter? This octagonal Easter egg box fits the bill! It is easier to make than it looks, though it is a bit fiddly and takes a while – but it is totally worth it. It will fit a small Easter egg or other gifts. I’ve filled mine with Lindor chocolates, and made one box for each of us.
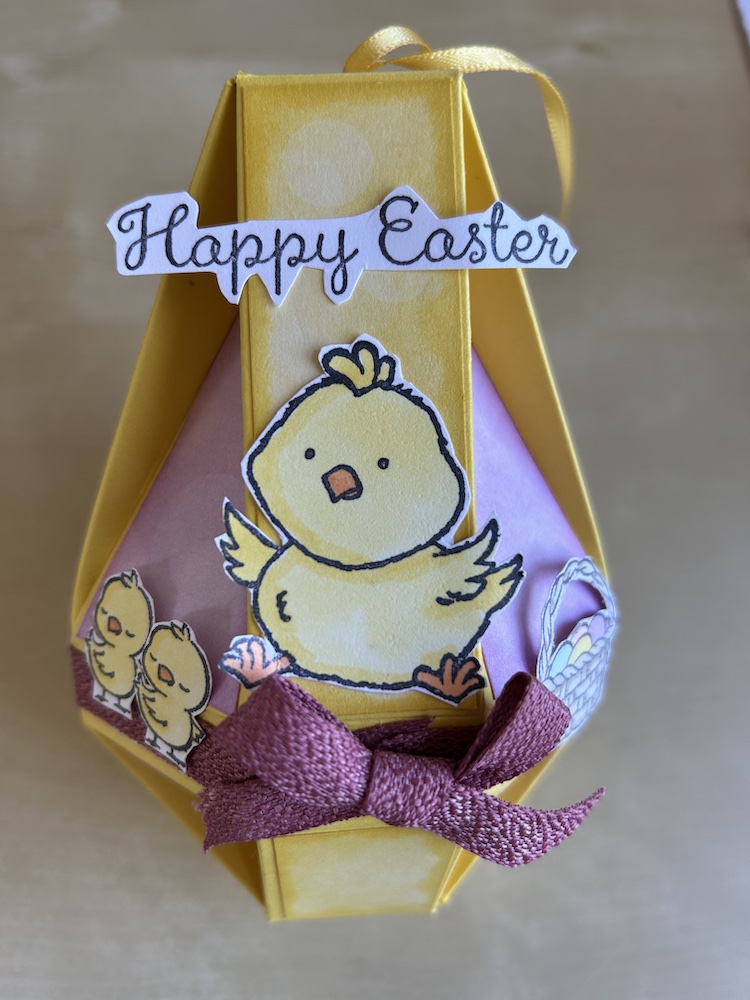
You can decorate the Easter egg boxes as you wish. A ribbon wrapped around the box looks great, with a bow at the front, and a few images and a sentiment completes the box. I used some retired stamps and fussy cut the animals and the sentiment.
I first saw this Easter egg box made by a French demo, but I have forgotten her name. I apologise that I have not been able to calculate the US sizes for this project, as US cardstock is a different size to our A4. Sorry. The measuerments are therefore all in centimetres.
To make the box you will need:
- One piece of A4 cardstock 21cm x 29.6cm
- DSP 1 (same or similar colour) 10.8cm x 8.2cm
- DSP 1 (same or similar colour) 10.8cm x 4.7cm
- DSP 2 (contrasting colour) 9cm x 8cm
- DSP 2 (contrasting colour) 9cm x 4.5cm
- Scraps of Basic White for deocration
- Ribbon – approx 12″ long (thin) for top and approx 12-14″ (wider) for middle and bow
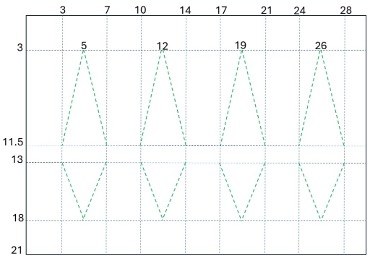
Score the cardstock on the short side at 3cm, 11.5cm, 13cm and 18cm.
Score on the long side at 3cm, 7cm, 10cm, 14cm, 17cm, 21cm, 24cm and 28cm.
Make a pencil mark on the first horizontal scoreline down at 5cm, 12cm, 19cm and 26cm. Repeat the marks on the bottom horizontal score line.
Use a stylus and firm ruler to score from each mark down to the centre score lines to form triangles.
Your Easter eg box base should now look like this:
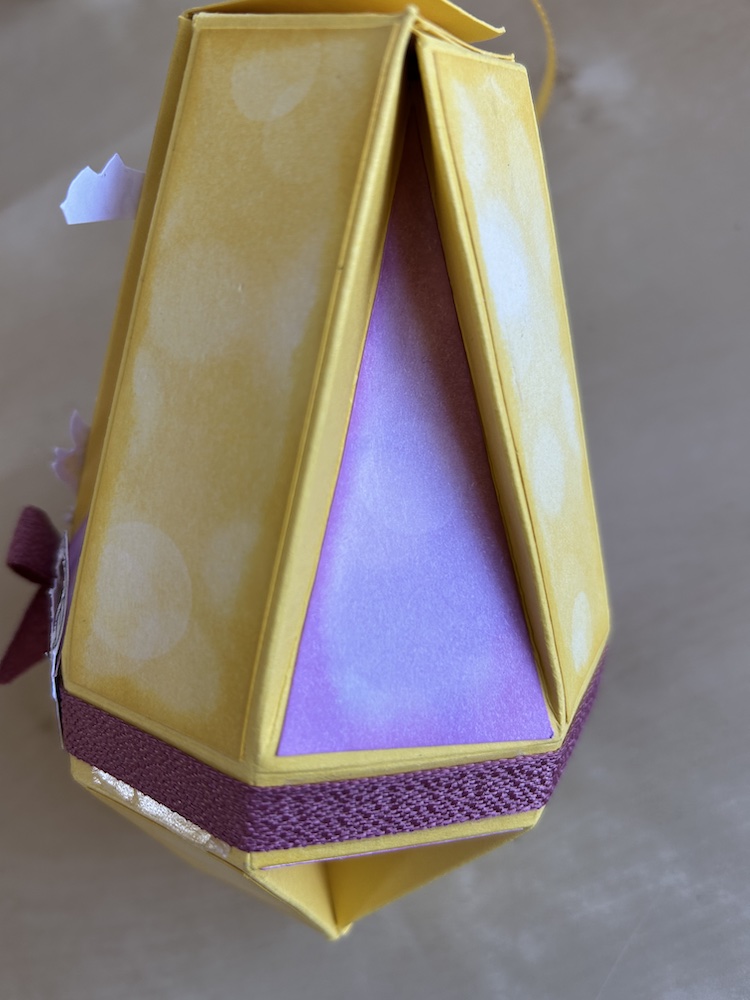
Fold each horizontal and vertical scoreline as mountain folds. Fold the triangle scorelines, carefully easing each side of the triangles inwards. See the video if you are unsure.
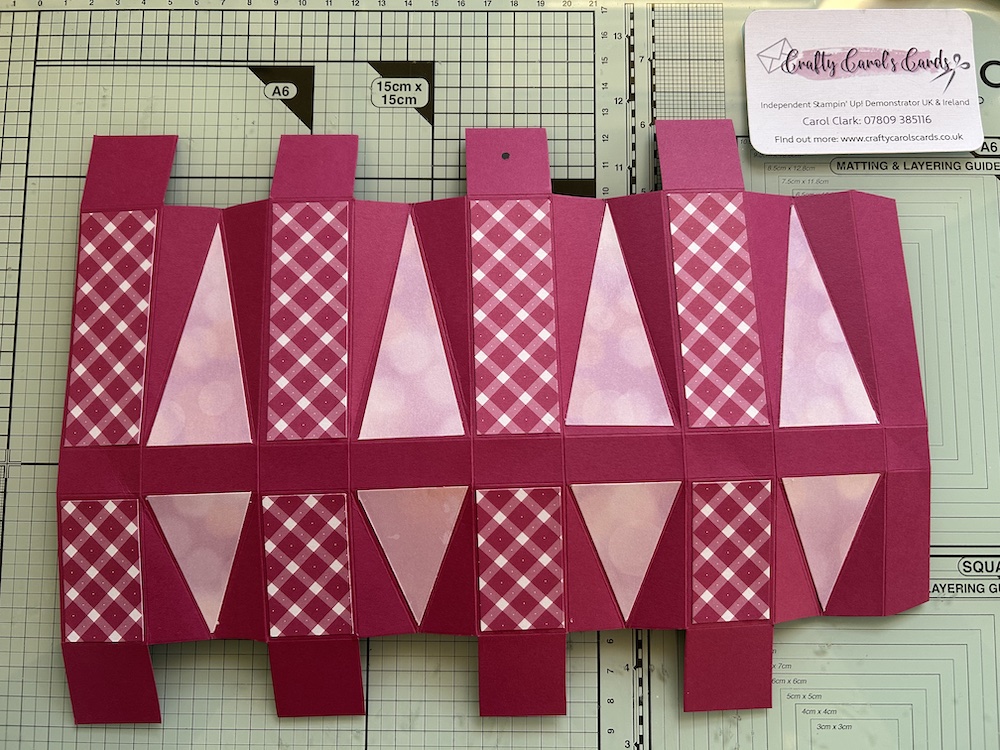
Cut away the panels above and below each triangle and the end tab. Your Easter egg box should now look like the picture below, where I have also punched a small hole in the centre of the third tab:

Prepare your decorations. Cut each piece of same/similar colour DSP on the 10.8cm side at 2.7cm, producing four strips of each size.
On each of the contrasting pieces of DSP, make a tiny pencil mark at 1.8cm and 5.4cm along the top of the 9cm side and 3.6cm and 7.2cm along the bottom (NB Do not turn your piece round!). Line up the marks and corners in your trimmer to cut four triangles from each piece, discarding the two end half triangles each time. Please see the video if you are unsure about this.
Optional step, but it looks good – use a sponge dauber to add some same colour ink around the edges of each strip and each triangle – it makes them “pop” when stuck down:
Stick each piece to the corresponding shape on the Easter egg box. It should now look like this:
Add strips of tear & tape to the end tabs. Fold over the box, make sure it lines up correctly and press closed.
Fold over each tab at the base, sticking each down firmly to the next making sure they stay square. Leave the top open until you have filled the box, then stick the three rear panels to each other using a glue dot to make them easier to open.
Add a length of folded ribbon through the front panel hole, holding it securely at the back with some tear & tape.
Add tear & tape to each panel around the centre of the box. Wrap around your chosen wider ribbon. Add a bow at the front – I tied mine separately and added it with two glue dots.
Stamp images to decorate your Easter egg box and add a sentiment as shown in the picture above. I used a retired stamp set and fussy cut the images and sentiment.
Here is the video of how to make this octagonal Easter egg box:
I hope you like this octagonal Easter egg box project and will have a go at making one.
Thank you for taking the time to read my post.

Don’t forget – you get a FREE tutorial of eight cards when you place an order with me. There’s a different set every month. And, if your order is over £40, you will also get to choose stuff from my online shop to the value of your order!
Product List ![Daffodil Delight A4 Card Stock [ 121680 ]](https://assets1.tamsnetwork.com/images/EC042017NF/121680s.jpg "Daffodil Delight A4 Card Stock [ 121680 ]") | ![Basic White A4 Cardstock [ 166781 ]](https://assets1.tamsnetwork.com/images/EC042017NF/166781s.jpg "Basic White A4 Cardstock [ 166781 ]") | |||
![Sponge Daubers [ 133773 ]](https://assets1.tamsnetwork.com/images/EC042017NF/133773s.jpg "Sponge Daubers [ 133773 ]") | ![Multipurpose Liquid Glue [ 154974 ]](https://assets1.tamsnetwork.com/images/EC042017NF/154974s.jpg "Multipurpose Liquid Glue [ 154974 ]") |
![Beautiful Bokeh 6" X 6" (15.2 X 15.2 Cm) Designer Series Paper [ 164607 ]](https://assets1.tamsnetwork.com/images/EC042017NF/164607s.jpg "Beautiful Bokeh 6\" X 6\" (15.2 X 15.2 Cm) Designer Series Paper [ 164607 ]")
![Daffodil Delight Classic Stampin' Pad [ 147094 ]](https://assets1.tamsnetwork.com/images/EC042017NF/147094s.jpg "Daffodil Delight Classic Stampin' Pad [ 147094 ]")
![Fresh Freesia Classic Stampin' Pad [ 155611 ]](https://assets1.tamsnetwork.com/images/EC042017NF/155611s.jpg "Fresh Freesia Classic Stampin' Pad [ 155611 ]")
![Daffodil Delight 1/8" (3.2 Mm) Satin Ribbon [ 164715 ]](https://assets1.tamsnetwork.com/images/EC042017NF/164715s.jpg "Daffodil Delight 1/8\" (3.2 Mm) Satin Ribbon [ 164715 ]")
![Moody Mauve 3/8" (1 Cm) Textured Ribbon [ 161630 ]](https://assets1.tamsnetwork.com/images/EC042017NF/161630s.jpg "Moody Mauve 3/8\" (1 Cm) Textured Ribbon [ 161630 ]")


Carol thank you for all your inspiration and hard work putting together these blog posts and videos. I love trying out all your makes
You are very welcome Margaret. Hope your recovery is going well x
Carol thank you for all your inspiration and hard work putting together these blog posts and videos. I love trying out all your makes