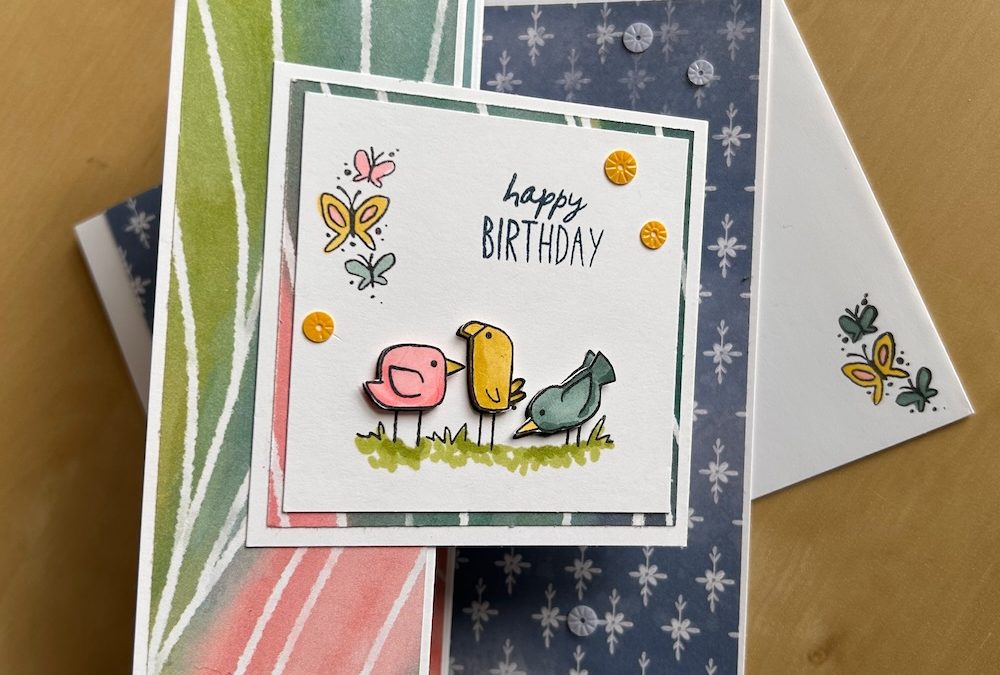
I don’t know if this fun fold has a special name, but I’m calling it a double fun fold card. I have seen it called a WV card to match the folds you make. We made it in my free online Craftalong session today – sign up for my emails to get all the details of my classes and lives.
This is a very versatile fold. I’ve used the gorgeous Cutest Crew bundle and made a birthday card, but you could use any smallish image and any sentiment for the occasion you wish to celebrate.
To make this card you need (US sizes in inches):
- a stamp set with a smallish image and smallish sentiment of your choice
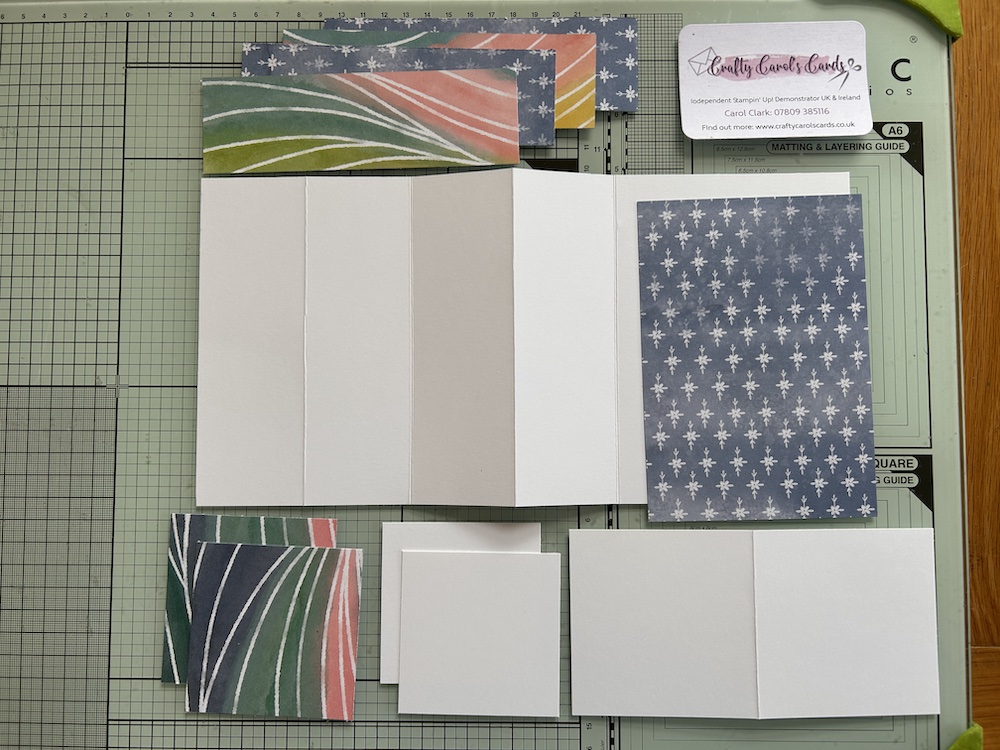
- card base A4/29.6cm x 14.8cm (11″ x 5½”)
- small card base 16cm x 8cm (6” x 3″)
- Basic White layer (x2) 7cm x 7cm (2½” x 2½”)
- scrap Basic White card for stamping
- any Designer Series Paper (DSP)- you can use all the same DSP or use coordinating pieces
- FOUR pieces 4.4cm x 14.4cm (1½” x 5¼”)
- ONE piece 10.1cm x 14.4cm (4″ x 5¼”)
- TWO pieces 7.4cm x 7.4cm (2¾” x 2¾”)
- a few coordinating gems
- your favourite adhesives, including dimensionals
Watch the video below or here are the basic instructions.
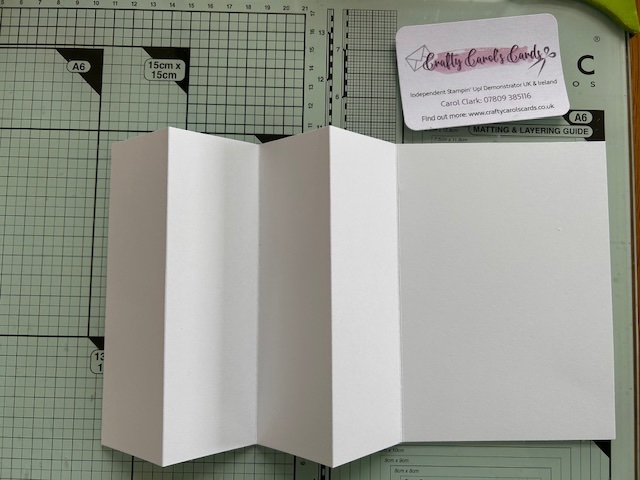
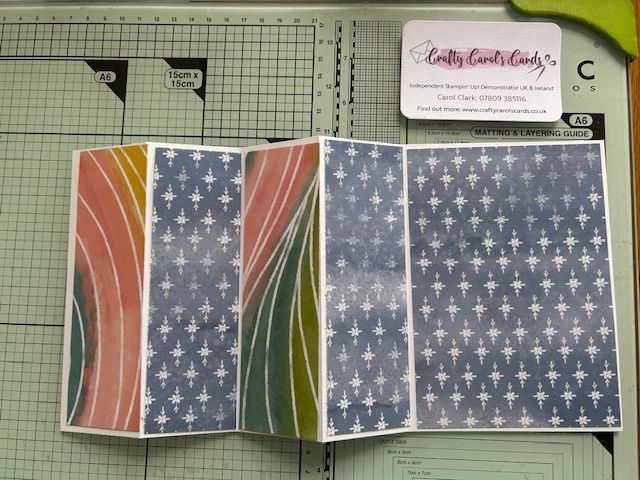
Score the base cardstock on the long side at 4.8cm, 9.6cm, 14.4cm and 19.2cm (1¾”, 3½”, 5¼” and 7″). Fold alternatively as mountain, valley, mountain and valley and burnish well.
Adhere the pieces of DSP to the cardstock. You can use whatever mix of patterns you want, but two coordinating but contrasting sheets works well.
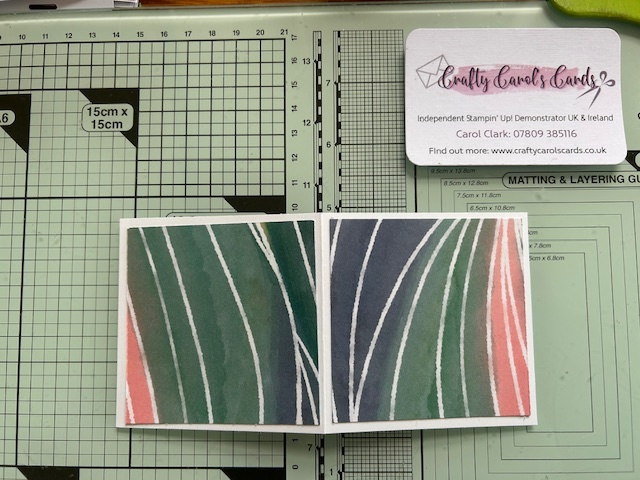
Score the small card base on the long side at 8cm (3″), fold and burnish.
Adhere the small squares of DSP to the small card, both on the outside.
Either stamp directly onto the small Basic White layers or stamp onto scraps of cardstock and cut out – your choice! I like some depth, so I usually stamp on scrap card and add them to my main card using dimensionals. For this card, you may want to keep the depth down as it is fairly thick anyway with all the folds in the card base.
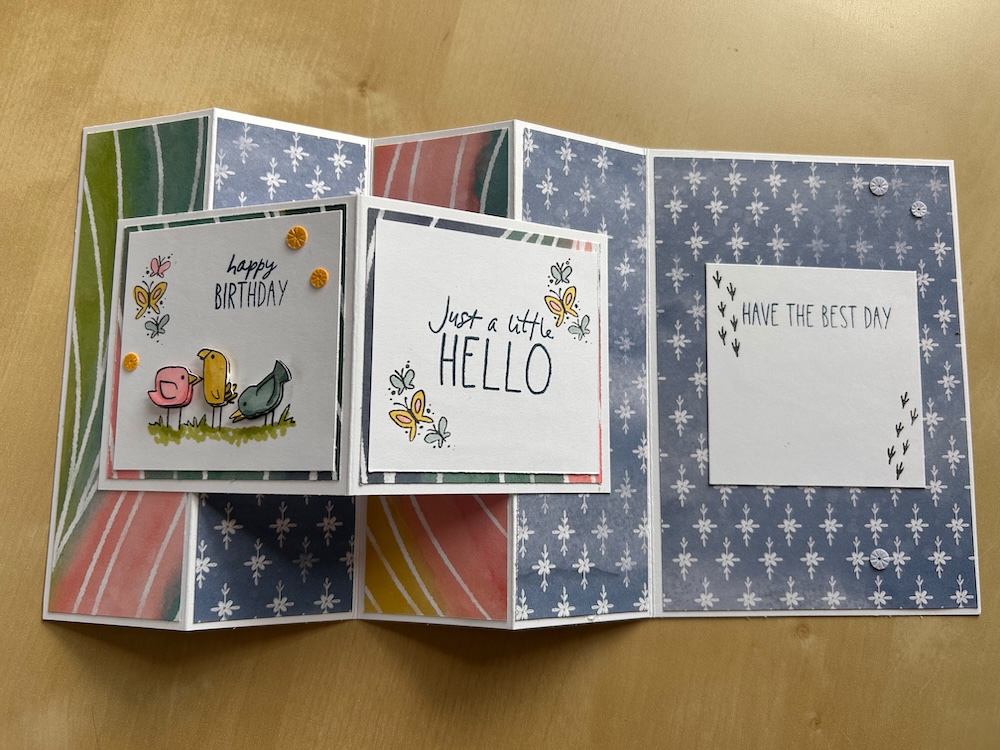
One piece of Basic White is for the front of the card (the LEFT hand side), so decorate with a smallish image and a sentiment. I used the Cutest Crew set for mine.
The other piece is for the opposite, inside of the card (the RIGHT hand side). You may add a small sentiment, but leave space to write a greeting too, or decorate again, if you want to put a greeting panel on the back panel of the main card.as I have done.
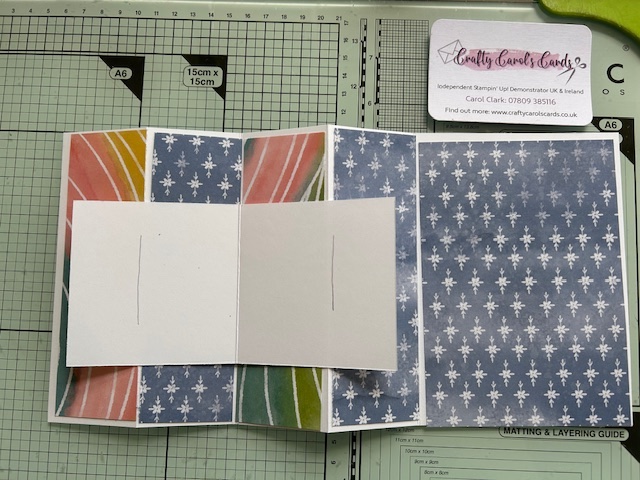
To stick the small card into the card base, turn it over and line up the fold with the second fold on the card base. Mark where the glue is to go, on the outside parts of the small card as shown below:
Glue the small card onto the card base and your card is complete. Add some gems or other embellishments if you want. I added a few starburst sequins.
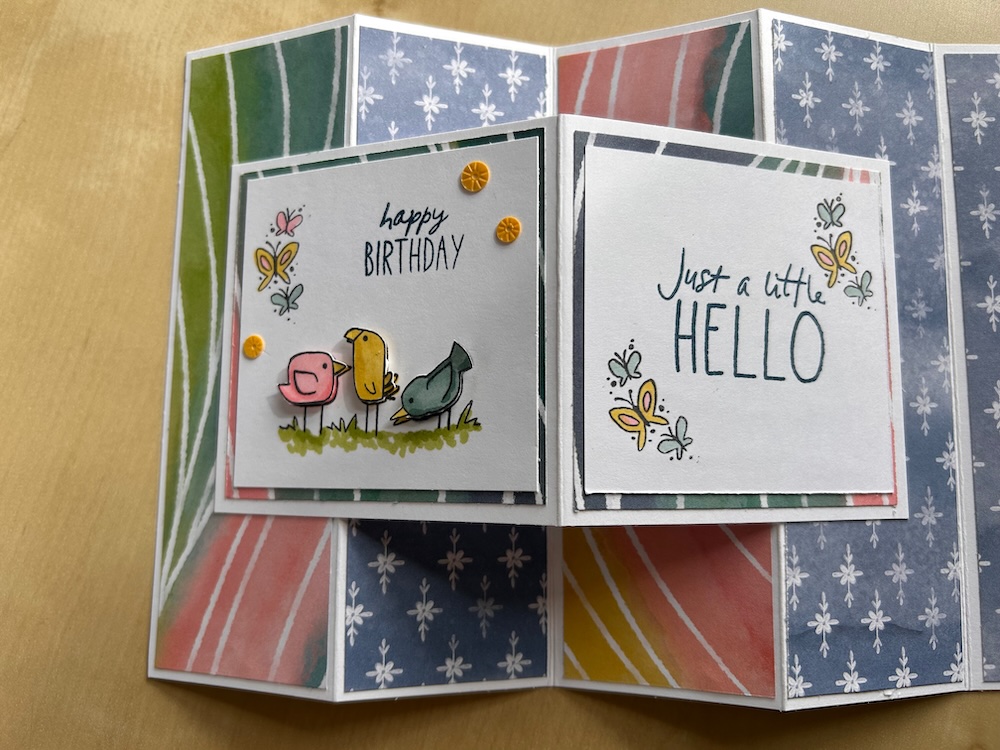
If you wish, you can add a piece of Basic White 7cm x 7cm (2½” x 2½”) onto the back panel for additional messages or greetings – stick it on so it is hidden by the small card base when the card is closed. You will, however, see it when the card is displayed. Your choice again!
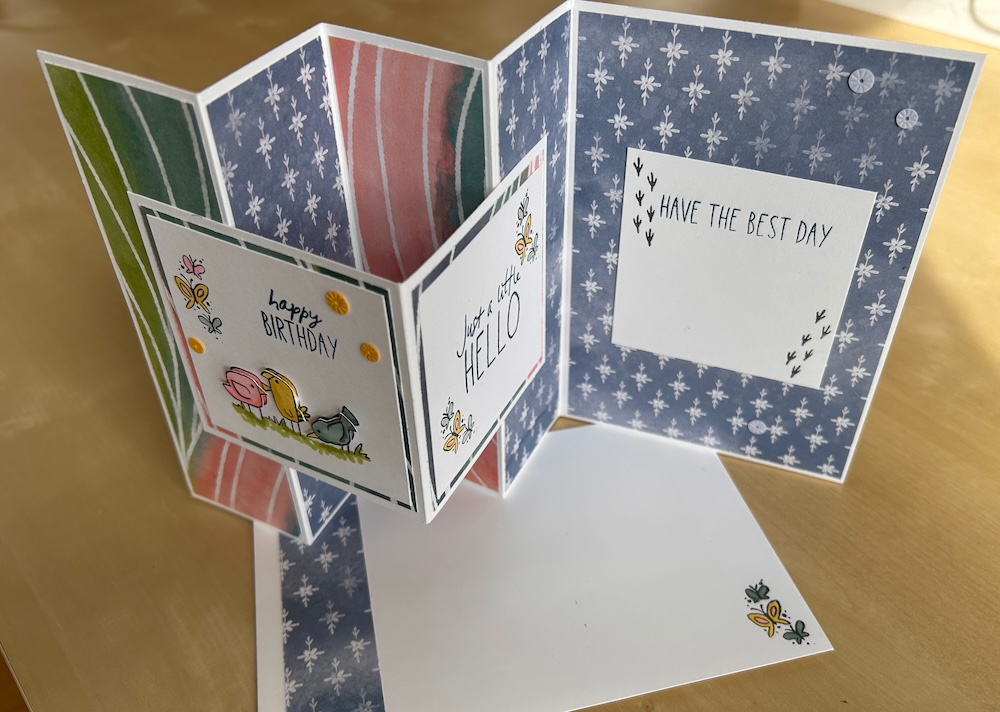
Don’t forget to decorate your envelope! I used a spare piece of DSP and stamped some butterflies.
Here is the video of us making the card in my Craftalong. Why not join us next time?
I hope you like this card and will have a go at making one – please show me what you come up with.
Thank you for taking the time to read my post.

Don’t forget – you get a FREE pdf when you place any order with me as your demonstrator. And, if your order is over £40, you will also get to choose stuff from my online shop to the value of your order!
Product List ![Cutest Crew Bundle (English) [ 167149 ]](https://assets1.tamsnetwork.com/images/EC042017NF/167149s.jpg "Cutest Crew Bundle (English) [ 167149 ]") | ![Basic White A4 Cardstock [ 166781 ]](https://assets1.tamsnetwork.com/images/EC042017NF/166781s.jpg "Basic White A4 Cardstock [ 166781 ]") | |||
![Tuxedo Black Memento Ink Pad [ 132708 ]](https://assets1.tamsnetwork.com/images/EC042017NF/132708s.jpg "Tuxedo Black Memento Ink Pad [ 132708 ]") | ![Multipurpose Liquid Glue [ 154974 ]](https://assets1.tamsnetwork.com/images/EC042017NF/154974s.jpg "Multipurpose Liquid Glue [ 154974 ]") |
![Painted Illusions 12" X 12" (30.5 X 30.5 Cm) Designer Series Paper [ 167977 ]](https://assets1.tamsnetwork.com/images/EC042017NF/167977s.jpg "Painted Illusions 12\" X 12\" (30.5 X 30.5 Cm) Designer Series Paper [ 167977 ]")
![Granny Apple Green Stampin' Blends Combo Pack [ 154885 ]](https://assets1.tamsnetwork.com/images/EC042017NF/154885s.jpg "Granny Apple Green Stampin' Blends Combo Pack [ 154885 ]")
![Darling Duckling Stampin’ Blends Combo Pack [ 165288 ]](https://assets1.tamsnetwork.com/images/EC042017NF/165288s.jpg "Darling Duckling Stampin’ Blends Combo Pack [ 165288 ]")
![Lost Lagoon Stampin’ Blends Combo Pack [ 161680 ]](https://assets1.tamsnetwork.com/images/EC042017NF/161680s.jpg "Lost Lagoon Stampin’ Blends Combo Pack [ 161680 ]")
![Misty Moonlight Stampin' Blends Combo Pack [ 153108 ]](https://assets1.tamsnetwork.com/images/EC042017NF/153108s.jpg "Misty Moonlight Stampin' Blends Combo Pack [ 153108 ]")

