It’s blog hop time again! This month’s theme is Thanks. I make a LOT of thanks cards for my team, those who buy from me and those who buy my retired products – which reminds me, do have a look at my shop as there may be something you want….
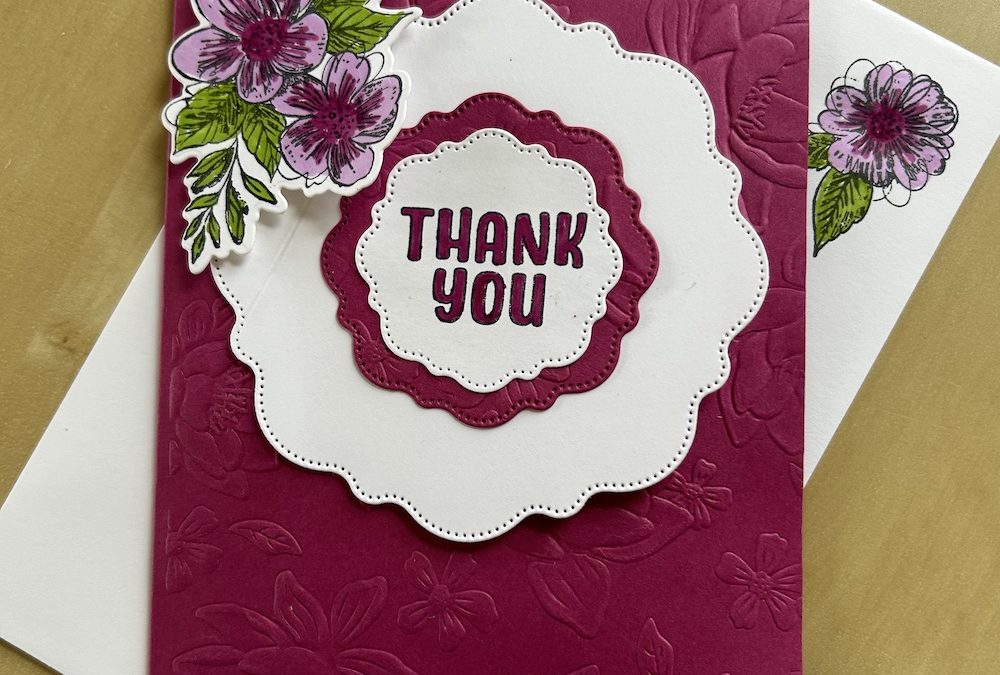
Anyway, for this blog hop thanks card, I decided to use a favourite Thoughtful Expressions and the matching dies and make a hidden message card. Sadly, Thoughtful Expressions does not have a thanks sentiment, so I used the Thank You from the Humble Home stamp set.

You will need:
- Berry Burst base card: 21cm x 14.8cm (8 ½” x 5 ½”)
- Basic White piece 10cm x 21cm for cutting out two frames
- Basic White inside panel 9.5cm x 13.8cm (3 3/4″ x 5″)
- Scraps of Basic White for the flowers and sentiment
- Memento ink pad
- Stampin’ Write markers or Blends for colouring
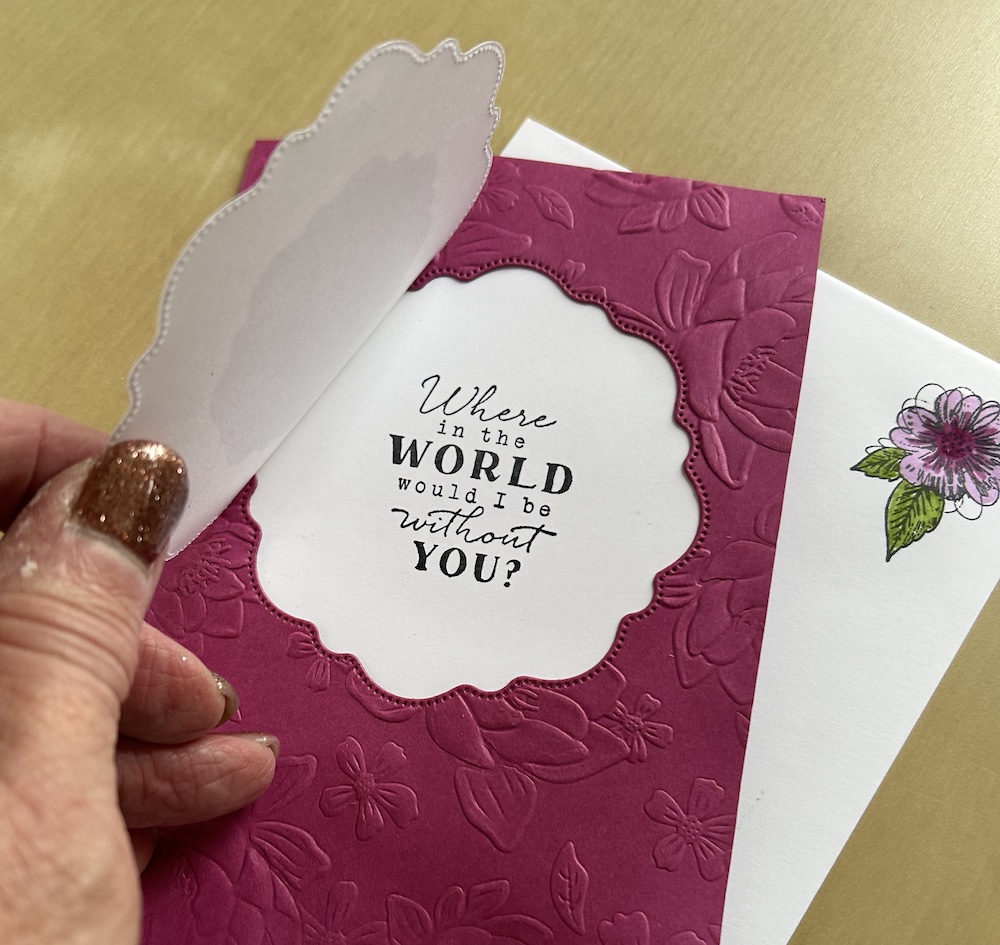
The instructions for how to make the thanks card are given below, or watch the video later in this post. The hidden message is shown in the photo below:
- Score the Berry Burst base cardstock at 10.5cm (4¼”). Fold and burnish.
- Die-cut two large curvy frames from the Basic White piece.
- Stamp one large flower cluster in Memento onto a scrap of Basic White and die-cut.
- Stamp the small flower cluster in Memento on the bottom right of the inner panel. You could add a sentiment if you wish to this panel.
- Stamp Thank you in Memento on a scrap of Basic White. Use the smallest curvy frame die to cut it out.
- Use your Stampin’ Write markers or blends to colour the flowers and fill in the Thank You. (I used Berry Burst and Granny Apple Green plus Fresh Freesia – which was a mistake as I had planned to use Bibble Bath! But it seemed to work.)
- Stamp the hidden message on the centre of one of the die-cut cuvry panels using Memento.
- Emboss the front of the card base using the Layered Floral 3D embossing folder by placing the card in the embossing folder then folding the back of the card underneath. See the video if you are unsure.
- Die-cut an aperture on the embossed front of the card using the second largest curvy frame die. NB: Make sure you line this up so the pattern matches the previously stamped panel.
- Stick the stamped hidden message panel behind the aperture adding glue around every edge. Stick down firmly.
- Score the top curvy frame around 1cm from the left hand edge. Add the front curvy frame panel over the aperture, using tear & tape to stick down only the scored edge (see picture).
- Add the large flower cluster over this edge as decoration using dimensionals.
- Die-cut a Berry Burst frame from the discarded aperture piece using the second smallest curvy frame die. Add the Thank You on top and stick down to the centre of the front frame. Your hidden message card is complete.
- Don’t forget to decorate your envelope!
I made this thanks card in my Craft with Carol LIVE today (join me every Tuesday at 2pm on YouTube and Facebook) – you can watch the video below:
You can find the links for all the products I used listed below.
Please now check out the wonderful cards made by my fellow T4S stampers via the links below.
See you again soon!
I hope you like this card and will have a go at making one – please show me what you come up with.
Thank you for taking the time to read my post.

Don’t forget – you get a FREE pdf when you place any order with me as your demonstrator. And, if your order is over £40, you will also get to choose stuff from my online shop to the value of your order!
Product List  |  |  | ||
 |  |  |  |  |
")


Love the hidden message element of this card Carol
Beautiful card – love hidden message element, TFS, Carol.
Beautiful card, I have totally missed those dies. They are gorgeous and I love how you have used them. x